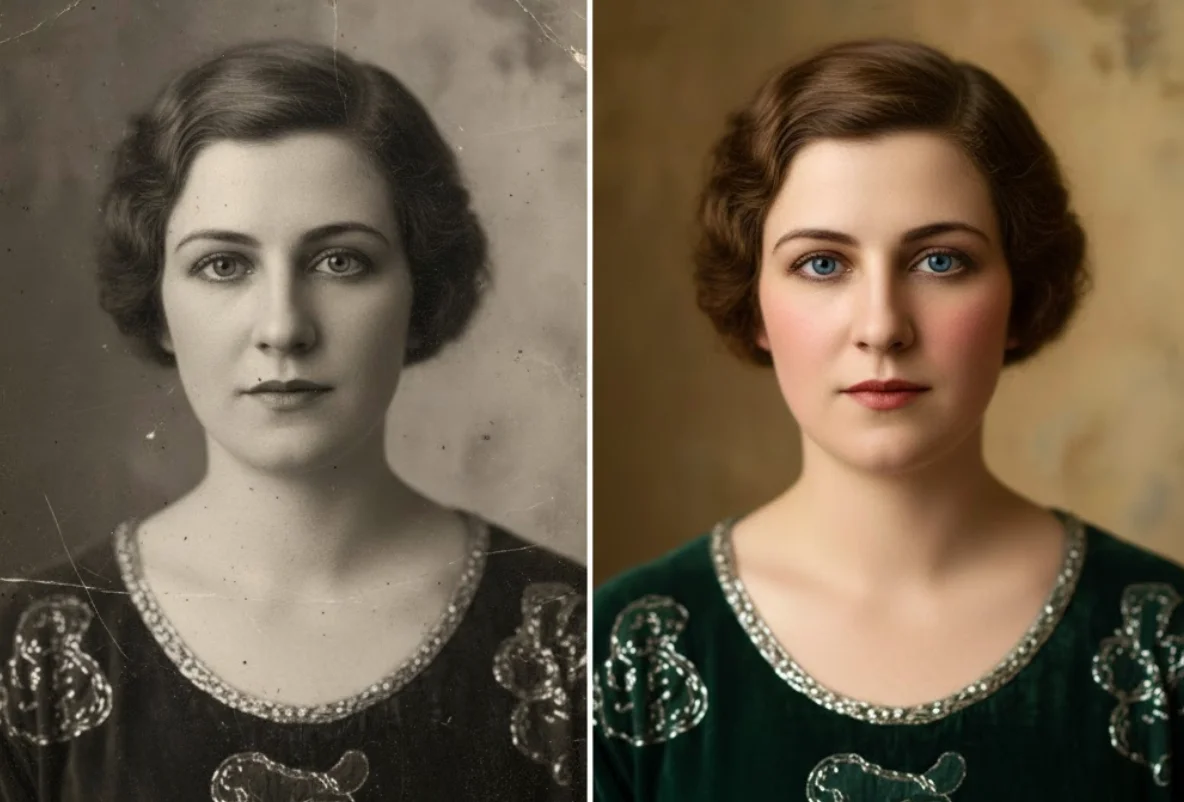
For a genealogist, a black-and-white photograph is a high-value historical asset. However, raw monochrome files are fundamentally data-constrained. They hide critical archival clues—such as the specific branch piping on a military uniform, the regional dye profile of an heirloom textile, or background environmental indicators that pinpoint a precise geographic location or season.
Yet, most automated attempts to add color destroy the historical integrity of the asset. Standard consumer applications apply generic color filters that over-smooth native film grain, create unnatural “waxy” skin textures, and introduce severe historical hallucinations.
To convert colorization from a novelty into a valid, indexable genealogy research methodology, you must understand the underlying photographic chemistry, the mathematical limits of neural inference, and the strict technical workflow required to preserve historical truth.
1. The Chemistry of the Archive: Material Constraints on AI
Artificial intelligence tools do not read a photograph the way a human archivist does. The neural network interprets an image purely as a matrix of luminance values (brightness channels ranging from 0 to 255).
Different historical photo-printing processes utilized distinct chemical emulsions. Over decades, these chemicals decay in highly specific ways, shifting the baseline pixel contrast and directly throwing off the AI’s predictive color maps. Before running an asset through a colorization pass, you must identify the native print medium and stabilize its degradation profile.
Archival Medium Optimization Matrix
| Photographic Medium | Historical Era | Chemical Composition | Native Degradation Profile | Required Pre-Processing Phase |
|---|---|---|---|---|
| Daguerreotype / Tintype | 1840s – 1880s | Iodine/bromine-sensitized silver plates or iron sheets. | Specular reflection, heavy edge tarnishing, silver mirroring. | High-pass filtering to isolate surface scratches from structural facial lines. |
| Albumen Print | 1850s – 1910s | Egg white binding medium containing silver nitrate on paper. | Intense highlight yellowing, highlights cracking, contrast flattening. | Linear histogram normalization; pull back yellow cast to clean white baseline. |
| Silver Gelatin Print | 1890s – Present | Suspension of silver halide crystals in a clear gelatin layer. | Deep, rich black tones; silver mirroring in high-density shadows. | Shadow point calibration to prevent the AI from misinterpreting silver sheen as blue/metallic color. |
| Chromogenic Print | 1940s – 1980s | Multi-layer dye couplers embedded in silver halide emulsions. | Cyan dye fading, severe magenta or yellow color shifting. | Full desaturation to clean grayscale master before re-introducing neural color mapping. |
2. The Math Behind the Model: Overcoming the “Hedging” Problem
To evaluate whether a colorization pass is historically valid, you must understand the internal logic of the neural network. Modern AI tools typically leverage Generative Adversarial Networks (GANs) or Diffusion Models configured with a U-Net architecture.
During training, the model is fed millions of color images that have been algorithmically converted to grayscale. The network attempts to reconstruct the original color values, minimizing the perceptual distance between its guess and the ground-truth original.
However, colorization is fundamentally an ill-posed mathematical problem. A grayscale pixel value provides no definitive signal as to whether the original object was blue, green, or red; all three could share identical luminance signatures.
[Grayscale Pixel: Luminance 142]
│
▼
[AI Neural Network]
│
▼
Calculated Probabilities:
├── Blue Fabric (33%)
├── Green Fabric (33%)
└── Red Fabric (33%)
│
▼
[The Hedging Problem]
(Model defaults to Safe Beige/Gray)
When confronted with high ambiguity—such as an unstructured piece of civilian clothing—the algorithm executes what machine-learning engineers call hedging. To avoid a heavy mathematical penalty for making a wildly incorrect color choice (e.g., painting a red dress bright green), the model chooses a statistical middle ground. This is why low-tier AI colorizers frequently spit out muddy, desaturated, or universally beige environments.
To overcome this, advanced platforms like BringBack.pro utilize specialized Identity-Lock Logic and contextual priors. The engine evaluates adjacent pixels and broader environmental context—recognizing that a specific uniform pattern correlates to an exact military branch, or that a specific facial boundary requires highly nuanced vascular skin tones rather than a flat, waxy peach overlay.
3. The Non-Linear Archival Workflow
Executing an archival-grade colorization requires a strict sequence of engineering interventions. If you modify resolution or upscale prior to cleaning the image, you amplify artifact noise, destroying the AI’s ability to map color accurately.
Never execute colorization on a compressed JPEG snapshot taken with a smartphone. Mount the physical photograph to a flatbed scanner. Scan the print at 600 DPI (1200 DPI for micro-tintypes) in uncompressed 24-bit TIFF format. Capturing the raw physical grain structure allows the AI to differentiate between natural texture and physical damage. Crop out all external scanner borders, physical cardboard mounts, and yellowed paper margins. If a white border or a dark mount is included in the file uploaded to the AI, the algorithm will compute those extreme tones into its global lighting calculations, skewing the overall contrast map of the central subject. Manually or semi-automatically patch physical emulsion cracks, water stains, and surface dust. If you leave a white scratch across a subject’s face, the colorization model will interpret that high-contrast boundary as an intentional edge, painting it with a jarring, artificial color halo. Export the stabilized grayscale asset as a high-quality PNG or JPG (up to 10 MB) and upload it to BringBack.pro. The system passes the file through its dual-path network, concurrently evaluating facial structure and environmental textures. The engine computes natural skin vascularity, hair tones, and background separation in under 30 seconds. Execute your final upscaling pass after the color coordinates are fully baked into the pixels. This ensures that the newly synthesized color boundaries are sharpened uniformly with the structural edges of the photograph, completely eliminating color bleeding.
4. The Genealogist’s Historical Verification Protocol
An AI-generated color photo is a secondary predictive analysis, not a direct primary source. Serious family history research requires that every automated color pass be cross-referenced and verified against historical records before it is entered into a formal ledger.
Step A: Cross-Referencing Military & Civil Uniforms
If your ancestor is pictured in military, police, or institutional attire, the AI’s color choice must be validated against structural historical databases:
- The Draft Registration Card: Look up the individual’s WWI or WWII draft registration records via national archives. These documents explicitly log physical characteristics, including eye color, hair color, and skin complexion as noted by the registrar at the time of enlistment.
- Regimental Insignia Guides: Examine the button configurations and collar tabs. Cross-reference the structural layout with historical military color plates to verify if the AI’s chosen coat color matches the official uniform regulations of that specific regiment and year.
Step B: Environmental and Seasonal Syncing
Analyze the background foliage to detect hallucinations:
- Check the leaf structure and density. If the AI renders a scene with vibrant green summer leaves, but historical records or weather data show the event occurred during an autumn or winter timeframe, manually override the visual interpretation in your research notes.
- Evaluate architectural materials. Ensure old wood, brickwork, and masonry tones align with the local geology of the area where the ancestor lived (e.g., matching regional red clay brick vs. imported limestone).
5. Standardized Metadata Schema for AI-Restored Assets
To maintain proper genealogical provenance, you must embed a structured log within your digital archive. Never replace the original grayscale file. Save your output distinctly and append this markdown log directly to your ancestor’s digital record folder.
“`markdown
ARCHIVAL ALTERATION & PROVENANCE LOG
[ANCESTOR_NAME]: Harrison Eugene Chaudhary
[ESTIMATED_PHOTO_DATE]: Circa 1914
[ORIGINAL_MEDIUM]: Silver Gelatin Print on Card Mount
TECHNICAL WORKFLOW DATA
- Digitization Standard: 600 DPI, Raw TIFF Scan (24-Bit)
- Primary Restoration Platform: BringBack.pro (Version 2026.2)
- Compute Block: Automated Neural Colorization Pass (GAN-Inference Engine)
- Optimization Parameters Applied: [X] Scratch Repair [X] Face Optimization [X] Neural Color Map
- Processing Latency: 28.4 Seconds
ARCHIVAL VERIFICATION & NOTES
- Complexion Validation: Confirmed via WWI Draft Registration Card (Serial #2411-B). Complexion logged as “Light,” Eyes “Blue,” Hair “Dark Brown.” AI mapped eye color correctly within plausible bounds.
- Textile Accuracy: Uniform coat colorized as Olive Drab (OD No. 3). Aligns accurately with U.S. Army Infantry regulations for the 1914-1918 deployment window.
- Asset Status: Secondary interpretive file. Original uncolored TIFF master retained in deep cold-storage archive.
6. Frequently Asked Questions (Archival Deep-Dive)
How does AI photo restoration handle interracial or mixed-race group photographs?
Standard, untrained consumer engines often suffer from demographic bias based on skewed training data, leading to inaccurate skin tone rendering in group photos. Premium models utilize multi-point exposure normalization to evaluate each face independently within its local shadow context. This ensures the engine respects individual vascular skin signatures without washing out darker tones or muddying lighter complexions.
What should I do if the AI colorizes a family heirloom or dress the wrong color?
Remember, the AI operates on mathematical probability, not memory. If your family letters or oral histories explicitly document that a wedding dress was pale lavender, but the AI paints it cream white based on luminance alone, you should export the color layer into an editor (like Photoshop or GIMP) and use a hue-rotation brush to manually correct the layer back to historical alignment.
Why is it critical to convert sepia or yellowed prints to grayscale before colorizing?
Sepia toning is an aging artifact or an aftermarket chemical treatment—it is not native color data. If you upload a heavily yellowed or warm-toned photo directly into a neural colorizer, the AI interprets that pervasive warmth as ambient golden-hour sunlight. The model will cascade this error across the entire image, turning skin surfaces dark orange and turning backgrounds muddy brown. Converting the image to a clean grayscale baseline strips out the chemical stain, leaving a pure luminance field that ensures an accurate, vivid color pass.
The goal is to turn a historical artifact into a living memory, making your family tree more accurate and engaging.
AI Photo Colorization: How Does It Work?
The magic behind this is AI photo colorization. Modern AI tools have been “trained” on millions of color photographs.
Think of it like a highly skilled artist. The AI has learned the typical colors of everything: skin tones, hair colors, different types of fabric, trees, brick buildings, and skies.
When you upload a black and white photo, the AI:
- Recognizes objects and textures in the image (a face, a coat, a tree).
- Makes an educated guess on the most probable, realistic color for each object based on its training.
- Applies the color seamlessly, paying attention to light, shadows, and context.
This isn’t just slapping a filter on it. It’s a sophisticated process that produces surprisingly accurate and natural-looking results in seconds.
The Best Tool to Add Color to Old Photos
While there are many options, we need a tool that is fast, accurate, affordable, and private—all crucial for genealogy work.
For this task, we again turn to BringBack.pro. While known for restoration, its colorization feature is top-tier and perfectly suited for genealogists.
Here’s why it stands out for this specific purpose:
- High-Quality, Realistic Colors: The AI is trained to produce natural skin tones and textures, avoiding the “painted-on” look of lesser tools.
- Combines Restoration + Colorization: This is a huge advantage. Most old photos aren’t just black and white; they’re also faded or damaged. BringBack.pro can repair scratches and add color in a single step.
- Incredibly Fast: You can colorize a photo in under 30 seconds. This allows you to process entire collections of photos efficiently.
- Affordable for Hobbyists: At a cost of around $0.50 per photo (20 credits for $9.99 with the Value Pack), it’s a budget-friendly way to enhance your entire family archive.
- Privacy is Guaranteed: As a genealogist, your records are precious. BringBack AI keeps your results in your own account until you choose to delete them and never uses them to train general-purpose AI models, ensuring your family’s privacy.
Step-by-Step Guide: Colorize Your First Ancestor Photo
Ready to see the transformation? Let’s walk through the simple process.
Step 1: Select and Digitize Your Photo
Choose a high-quality black and white photo from your collection. A clear, well-focused image will always give the best results.
You need a good digital copy.
- Use a Scanner: For the best quality, scan your photo at 300 DPI or higher. This is the best way to turn a black and white photo into a digital file.
- Use a Scanning App: Apps like Google’s PhotoScan are excellent for quick, glare-free captures with your smartphone.
Read this step by step expert guide on how to digitize your photos
Step 2: Upload to the AI Colorization Tool

Navigate to the BringBack pro website. The interface is clean and simple. Choose photo restoration option, then you’ll see an option to upload your photo. Select the digital file you just created.
Step 3: Colorize with a Single Click

This is where the magic happens. The platform will automatically analyze your black and white photo. In the same process where it checks for damage, it applies its colorization algorithm.
There are no complicated settings or color wheels to manage. The AI does all the work.
In less than 30 seconds, the process is complete.
Step 4: Analyze and Download Your Colorized Photo
You will now see a full-color version of your ancestor’s photo.
Review the details. Look at the skin tones, the clothing, and the background. The AI-generated colors are historically plausible and bring a new sense of life to the image.
You can now download the high-quality color photo and add it to your records in Ancestry, MyHeritage, or your personal genealogy software.
A Word of Caution: Colorization as a Clue, Not a Fact
This is critical for serious genealogical research.
AI-generated color is an interpretation, not a historical record.
The AI makes a highly educated guess. It knows that in the 1940s, a certain style of dress was likely made of wool and would be a certain color. But it doesn’t know if your great-aunt’s dress was blue or green.
- Always Label Your Work: Save the colorized image as a new file. For example, “John_Smith_1930_colorized.jpg”. Never overwrite your original black and white scan.
- Look for Corroboration: The color of a military uniform or medal can often be verified with historical records. Use the colorization as a starting point for further research.
Treat the colorized photo as a vibrant clue that brings you closer to the truth.
Your Action Plan for a More Colorful Family Tree
- Select Key Photos: Start with a few of your most important or clearest black and white portraits.
- Digitize for Quality: Create the best possible digital copy using a scanner or scanning app.
- Use an AI Tool: Upload your photos to a platform like BringBack.pro to instantly restore and colorize them.
- Analyze and Document: Review the newly colored photos for details, but remember to label them as colorized interpretations.
- Share and Discover: Share the colorized images with your family to unlock new stories and memories.
Adding color to your genealogy photos is one of the most exciting advancements in family history research. It’s a simple, affordable step that can have a profound impact on how you see, understand, and connect with your ancestors.