Blog

  • Preparing Photos for Your Family Reunion: Digital Restoration Guide

    Preparing Photos for Your Family Reunion: Digital Restoration Guide

    You’re planning the family reunion. You’ve handled the venue, the food, and the guest list.

    Now you need the one thing that truly brings everyone together: the memories.

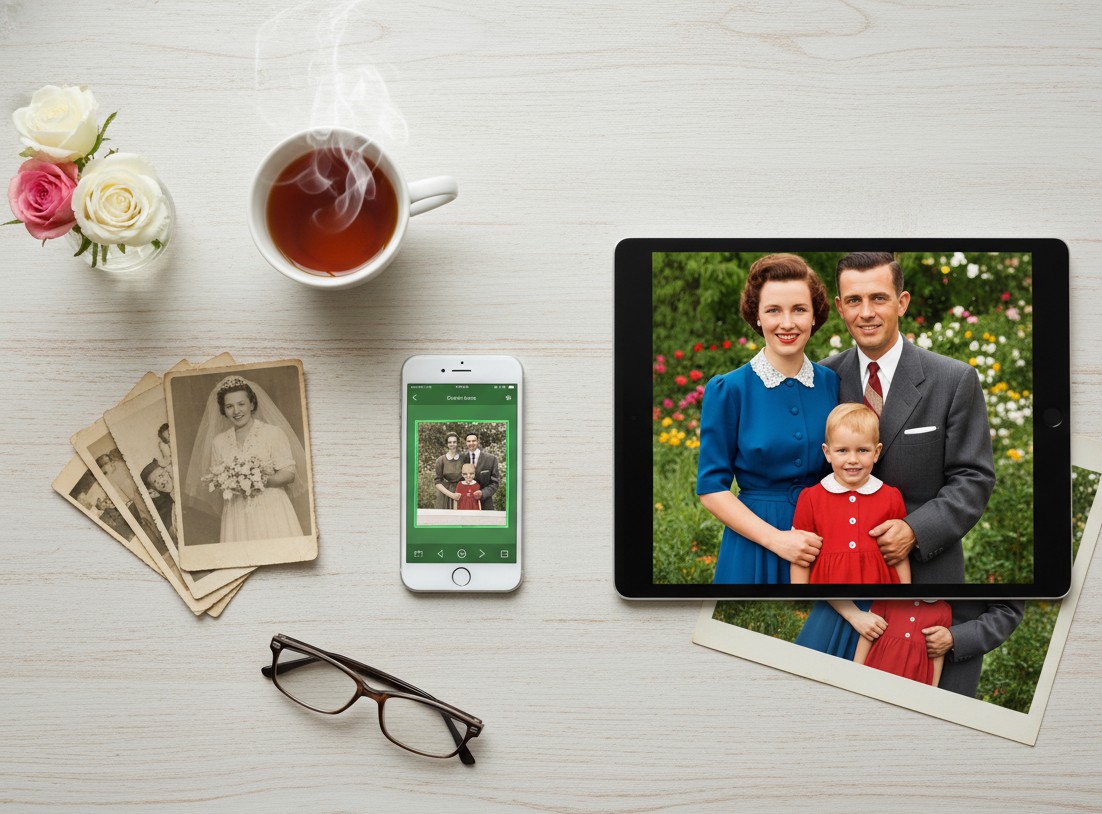
    Old family photos are the heart of any reunion. A slideshow of grandpa as a boy, a display of your parents’ wedding—these are the moments that spark joy and connection.

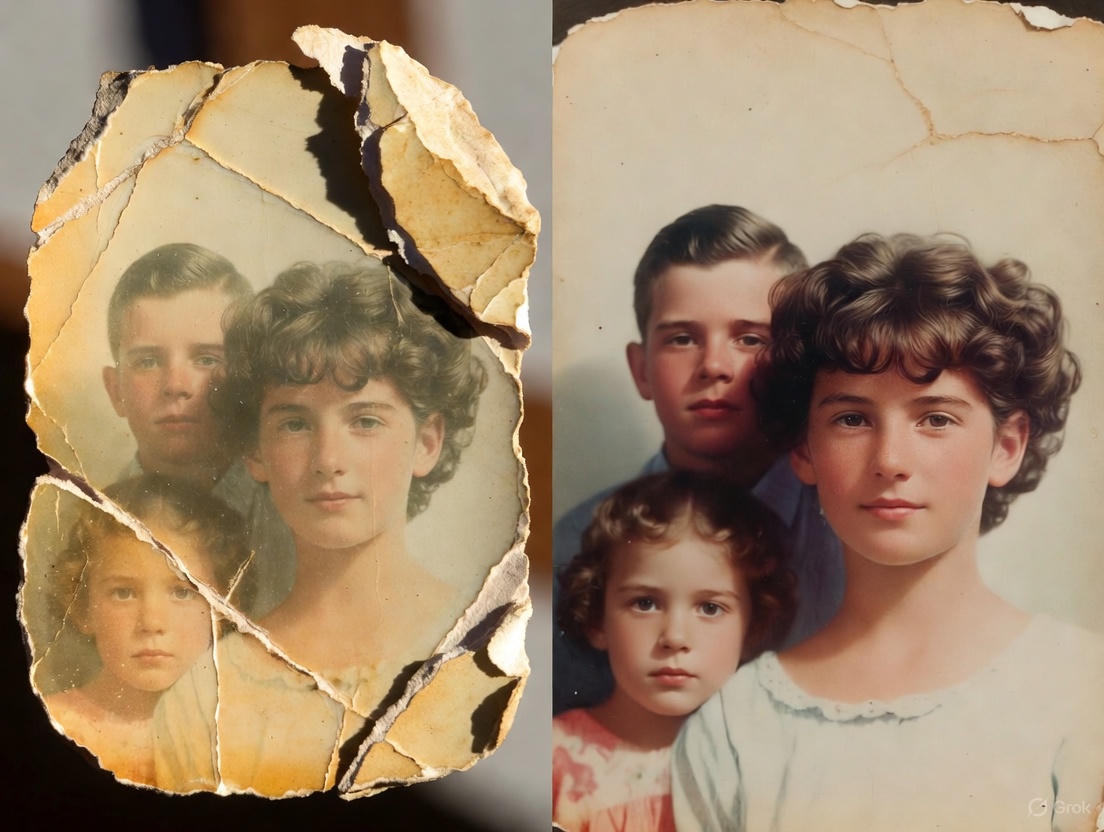
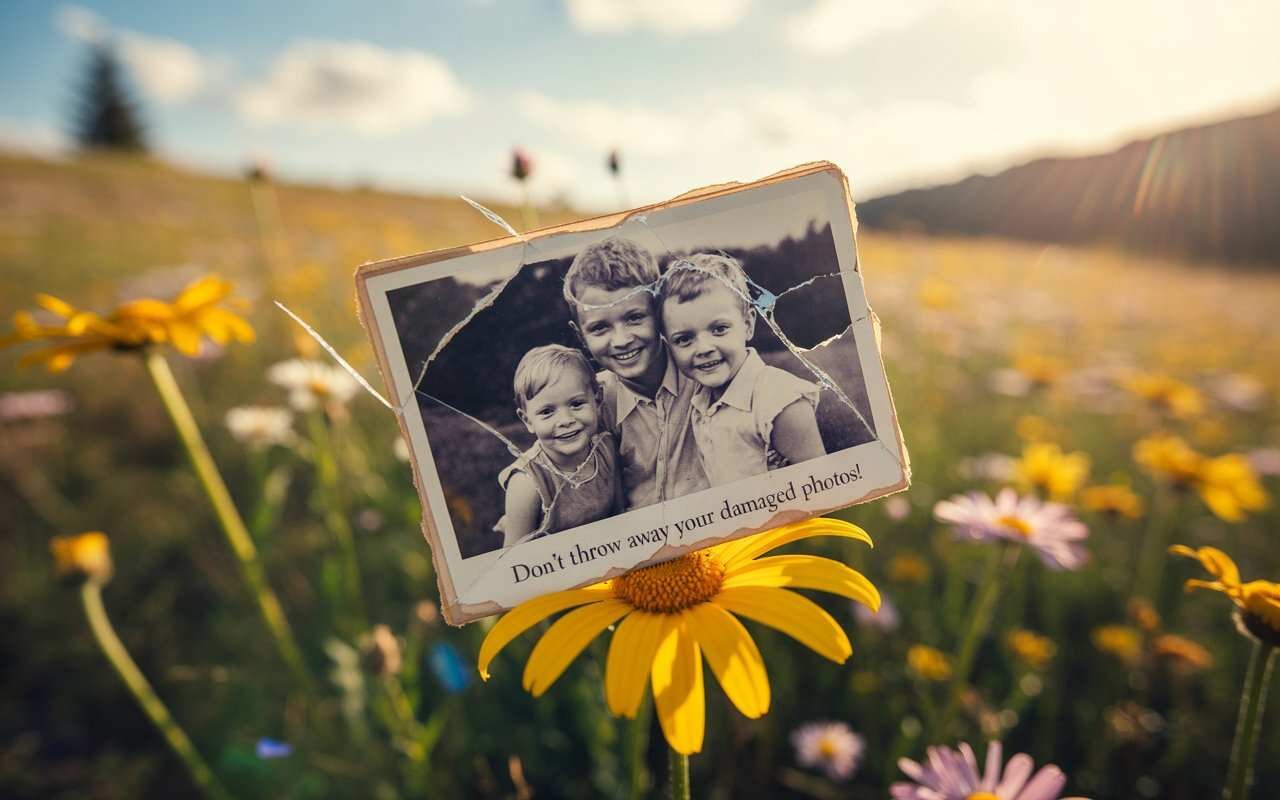
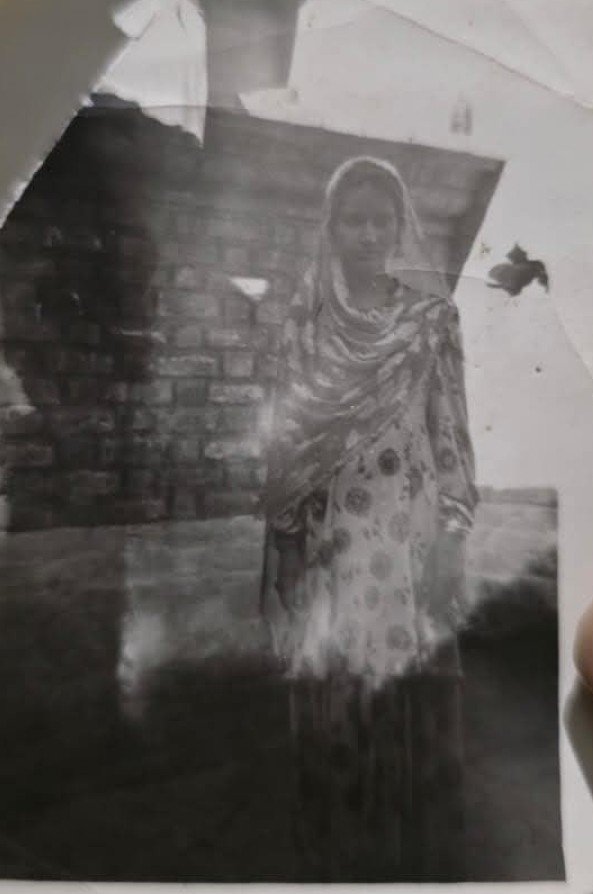
    But there’s a problem. Many of your best family photos are probably torn, faded, covered in scratches, or stained. Displaying them as-is feels like showing a dimmed, broken memory.

    This guide will show you how to fix that—easily and instantly.

    We’ll show you how to prepare your photos for the big event. First, we’ll cover the best way to digitize photos, and then, how to restore them instantly, turning them into the highlight of your reunion.

    Why You MUST Use Restored Photos for Your Reunion

    Before we get into the “how,” let’s be clear: this is about creating an experience. This is the “wow” factor.

    • It Sparks Conversation: A clear, restored photo of a shared ancestor will have cousins and aunts pointing and sharing stories you’ve never heard.
    • It Honors Your Elders: Displaying a beautifully restored portrait of the family patriarch or matriarch is a powerful tribute.
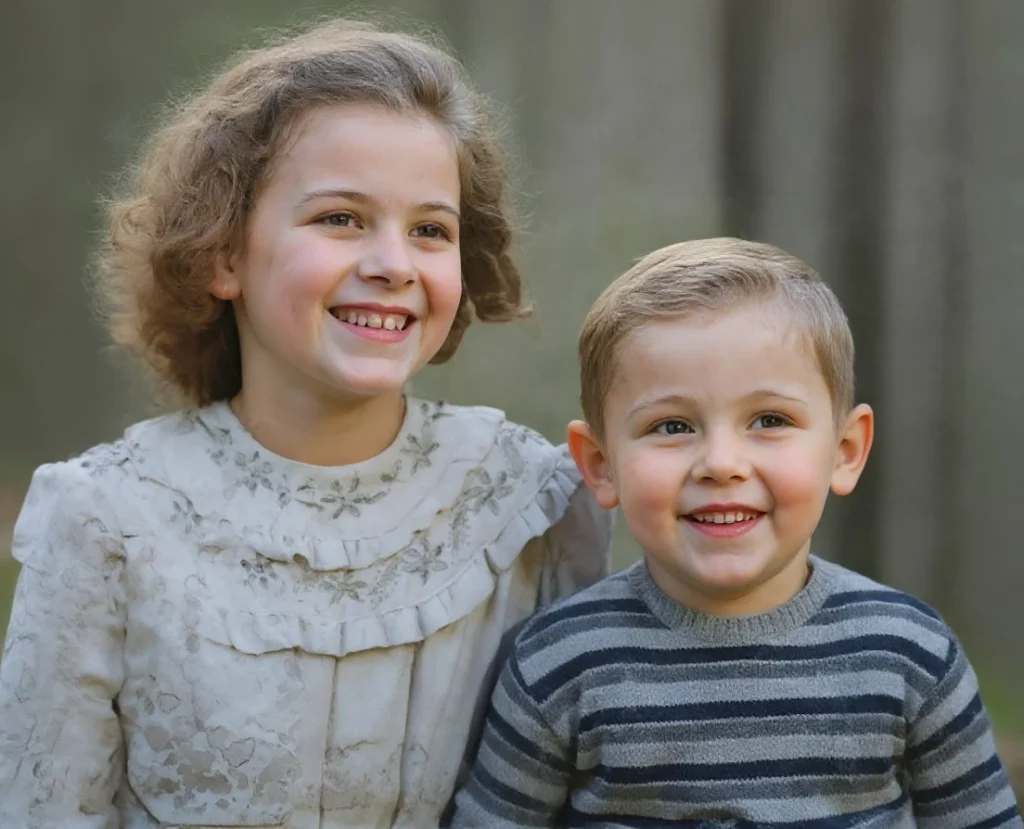
    • It Engages the Kids: Young members of the family are captivated by seeing their parents or grandparents as children, especially when the photos are clear and colorful.
    • It Creates a Lasting Gift: Restored photos can be printed and given as take-home favors, a far more meaningful gift than a customized keychain.

    The bottom line: Restored photos transform a simple get-together into an unforgettable event.

    The Old Way is Too Slow for Event Planning

    Traditionally, if you wanted to restore a box of old family photos, you had two choices:

    1. Professional Restoration: This gives great results but is incredibly slow and expensive. You could pay 50−50-50− 200 for a single photo and wait weeks. That’s not practical when you’re on a reunion budget and timeline.
    2. DIY with Complex Software: Using a tool like Photoshop requires skill and a lot of time. As an event organizer, you have a million other things to do.

    Neither of these options works well for preparing a large batch of photos for an event.

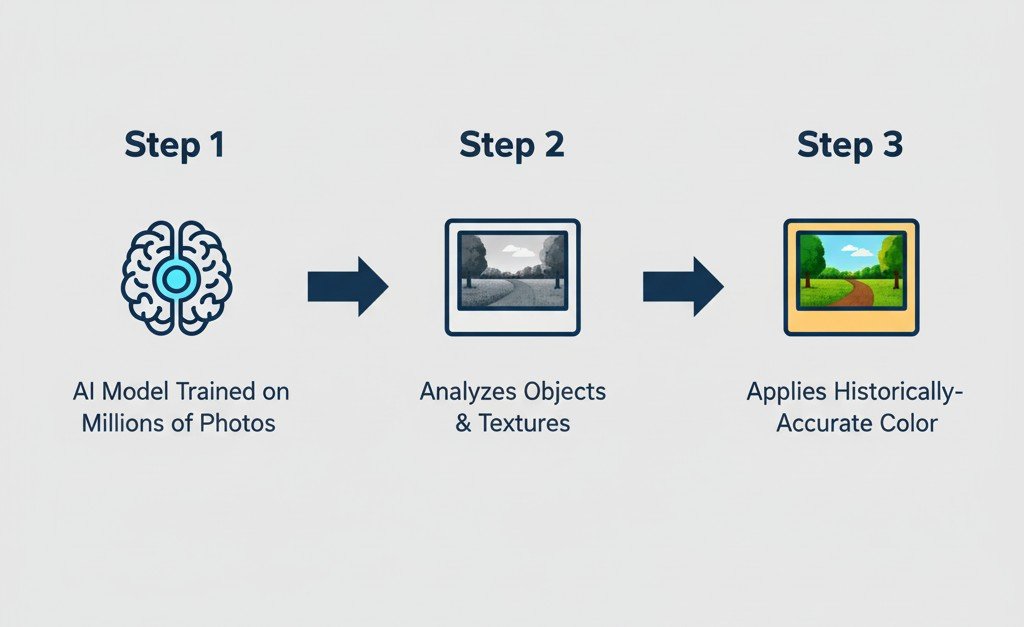
    The New Way: AI Restoration in Seconds

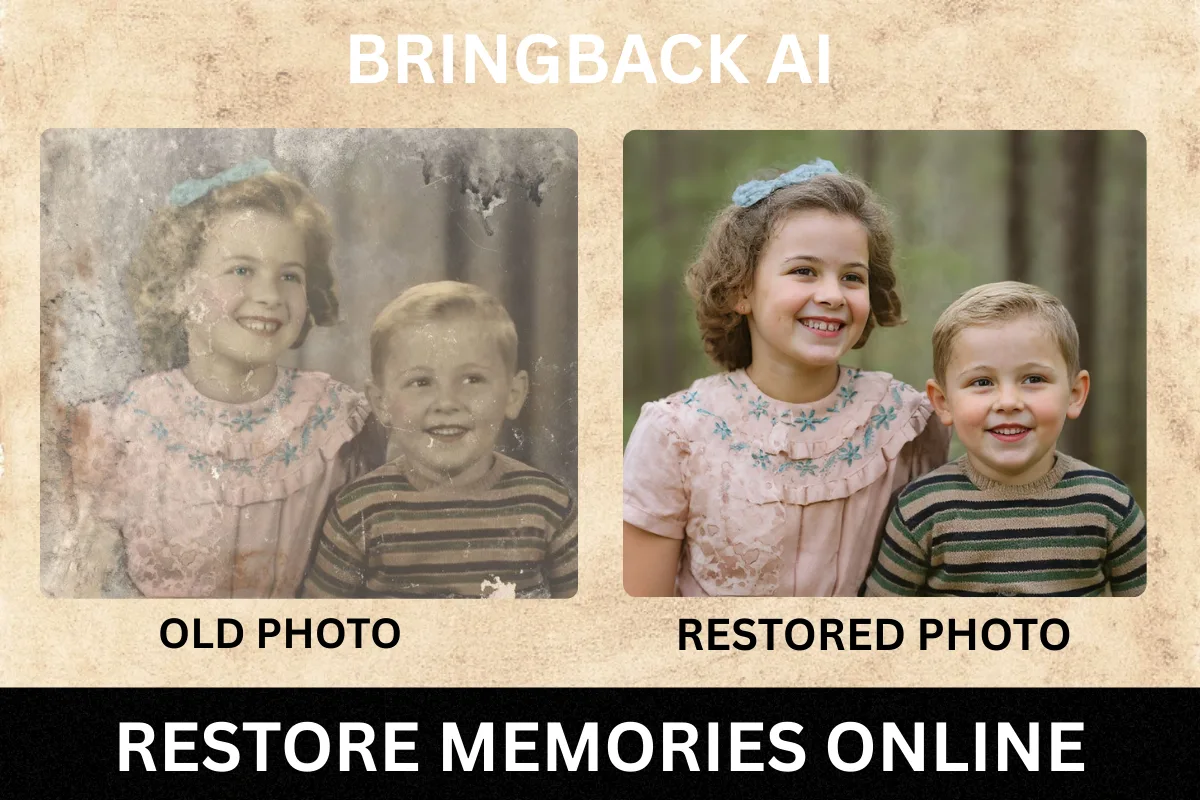
    This is where AI changes the game for family reunion planners. A tool like BringBack AI is built for this exact task.

    It’s an online platform that uses artificial intelligence to automatically fix your old photos. You don’t need any technical skills.

    Here’s why it’s the perfect tool for the job:

    • Instant Results: Upload a photo, and it’s restored in under 30 seconds. You can prepare dozens of photos in the time it takes to watch a TV show.
    • Extremely Affordable: Restore 5 photos for just $2.49. This lets you build a huge, beautiful collection for your reunion without draining your budget.
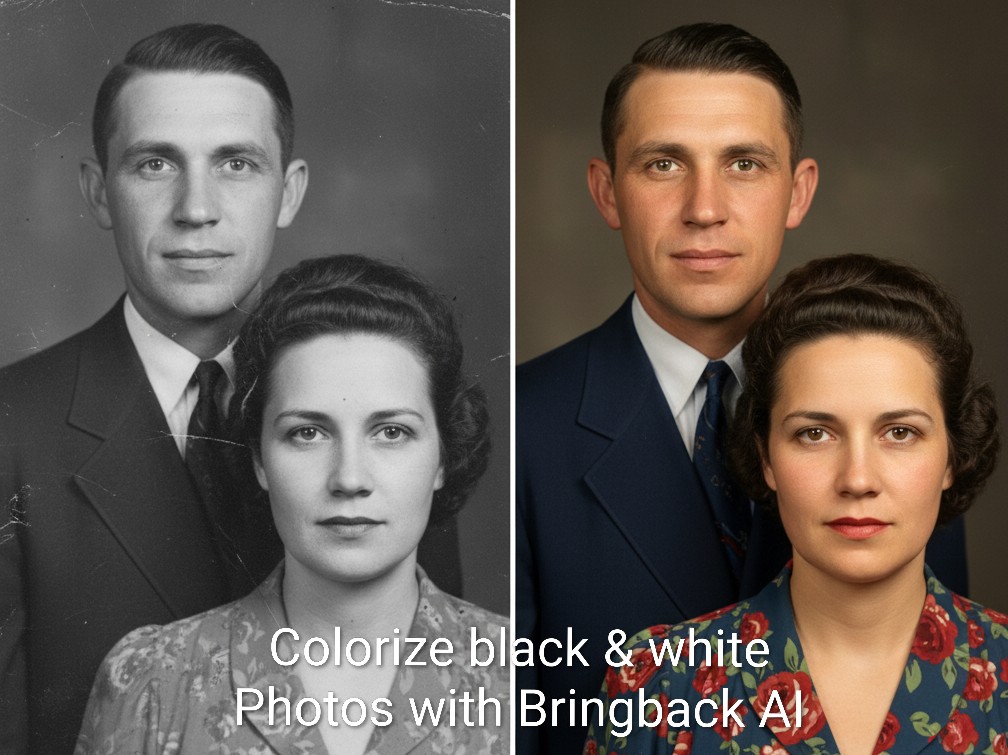
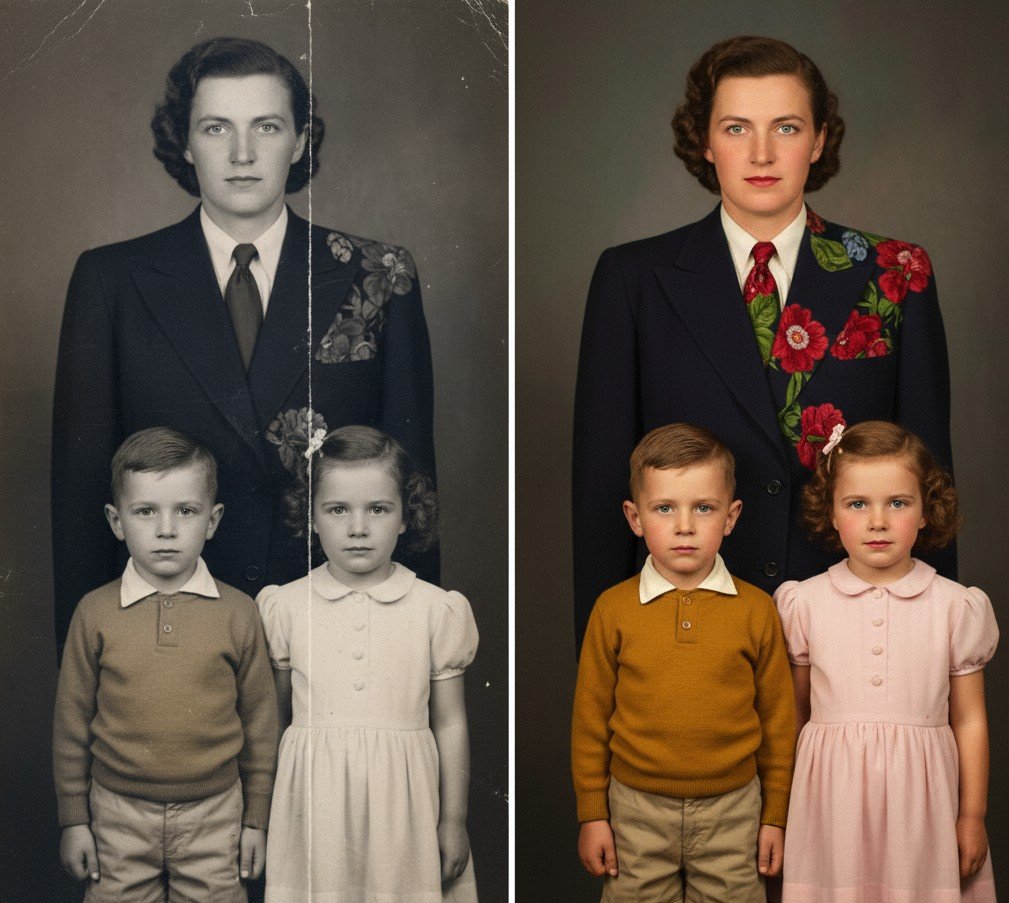
    • Automatic and Effortless: The AI handles everything. It removes scratches, fixes tears, corrects faded colors, and sharpens focus with one click.
    • Completely Private: Your family photos are personal. BringBack.pro deletes uploaded files within 30 minutes, ensuring your memories remain yours alone.

    Step-by-Step: How to Digitize Old Photos from Your Family Collection

    Let’s get tactical. Here is your complete workflow for preparing photos for the big day.

    Step 1: Gather and Curate Your Photos

    Before you restore, you need to collect.

    • Reach Out to Family: Ask key family members (especially older ones) to look for their best old photos. Give them a deadline!
    • Choose a Theme: Don’t just grab random pictures. Create categories that will tell a story at your reunion.
      • Weddings Through the Generations
      • “Guess the Baby” Photos
      • Family Vacations Over the Years
      • Generational Portraits (Grandmother, Mother, Daughter)

    Step 2: Scanning the photos for restoration

    Before you can restore anything, you need a good digital copy. This process is often called digitising photographs, and it’s the most crucial step. Getting a clean digital image is essential.

    Here are the two best methods to convert photographs to digital.

    Option A: Using a Scanner to Digitize Photos

    This method generally gives you the highest quality and is the best way to digitize photos if you have access to a scanner.

    • What You Need: A flatbed scanner is ideal. These are often part of an all-in-one home printer.
    • Clean the Scanner Bed: Wipe the glass with a lint-free cloth to avoid dust spots on your scan.
    • Choose Your Settings: You’ll see an option for resolution, measured in DPI (dots per inch).
      • For standard-size photos (4×6, 5×7), use 300 DPI.
      • For very small photos (like old passport-sized portraits), use 600 DPI.
    • Save as a JPEG or PNG: This will create a high-quality file on your computer, ready for the next step.

    This process to scan photos to digital is straightforward and ensures you capture as much detail as possible from the original print.

    Option B: Using Your Phone to Digitize Photos Instantly

    Don’t have a scanner? No problem. Your smartphone is an incredibly powerful tool to digitize photos quickly, especially when you’re gathering pictures from multiple relatives.

    • What You Need: Your smartphone and a good photo scanning app.
      • We recommend Google’s PhotoScan. It’s free and uses a special process to capture glare-free, high-resolution images.
    • Find Good, Even Lighting: Place the photo on a flat surface near a window, but out of direct, harsh sunlight. Avoid using your phone’s flash, as it creates a terrible glare.
    • Follow the App’s Instructions: PhotoScan will guide you to move your phone over the photo to capture it from multiple angles. This is how it removes glare and distortion.

    This is the easiest way to digitize old photos when you’re at a relative’s house and want to quickly capture a treasure from their photo album.

    For an in-depth guide about how to scan photos with mobile you can go through this article written at Wired.com

    Step 3: Restore with BringBack.pro (The Magic Step)

    Now that you have your digital files, it’s time for the fun part.

    Forget spending weeks waiting for a professional or hours struggling with complicated software. We’re going to use an AI tool called BringBack AI because it’s perfect for this exact task.

    Here’s why it’s the best choice for a busy reunion planner:

    • It’s Instant: The entire restoration process takes under 30 seconds per photo. You can prepare an entire slideshow in one afternoon.
    • It’s Affordable: You can restore 5 high-quality photos for just $2.49. This is a tiny investment for a massive impact on your event.
    • It’s Automatic: The AI does all the work. It removes scratches, repairs tears, brightens faded colors, and sharpens blurry faces with a single click.
    • It’s Private and Secure: Your personal family photos are safe. Uploaded files are deleted from their servers within 30 minutes.

    This is the fast and easy part.

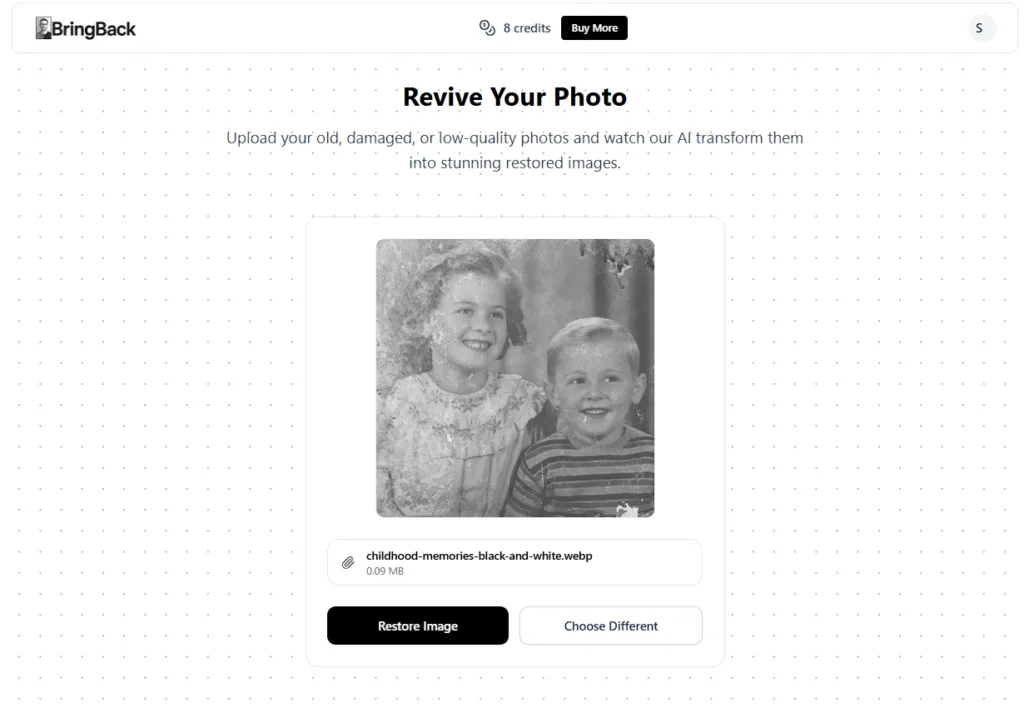
    1. Go to the BringBack.pro website.
    2. Upload the scanned photo you want to fix.
    3. Let the AI automatically repair the damage.
    4. In less than 30 seconds, your restored photo is ready.
    5. Download the high-quality, vibrant “After” image.
    Before and after showcase of old damaged and restored photograph of a family
    Before and after showcase of old damaged and restored photograph of a family

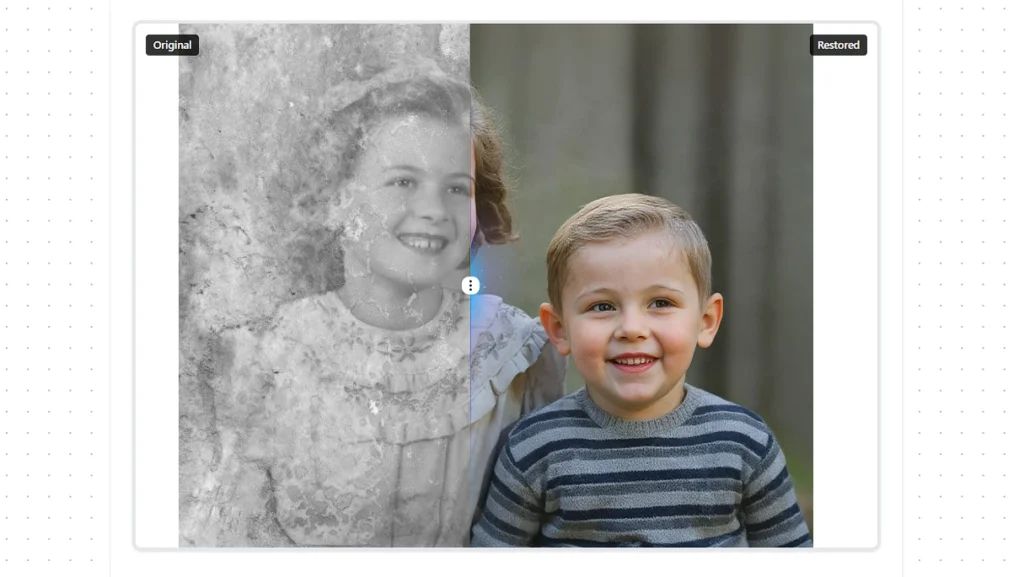
    Look at the difference. A faded, scratched photo becomes a clear, engaging portrait ready for display.

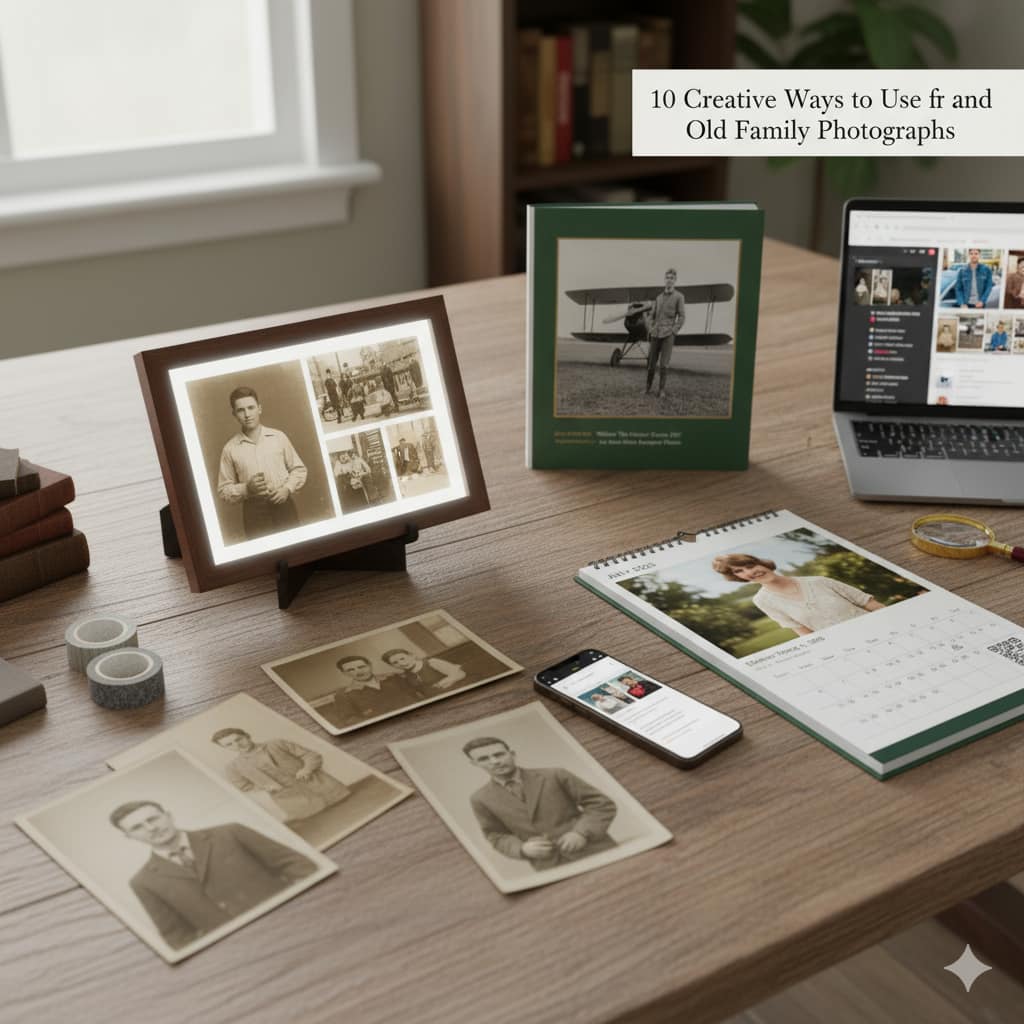
    Step 4: How to Display Your Restored Photos at the Reunion

    Now that you have a folder full of beautifully restored images, how will you show them off? Think beyond just taping them to a wall.

    Digital Display Ideas:

    • Create a Rolling Slideshow: This is the easiest and most dynamic option. Use a TV or a projector to have the restored photos cycle throughout the event. You can add names and dates to each photo.
    • Make a Short “Family History” Video: Use a simple video editor to combine the restored photos with music. You can even ask an older relative to narrate a short story to go with it.

    Physical Display Ideas:

    • A “Memory Lane” Clothesline: A very popular and charming idea. String twine between two points and use clothespins to hang the printed restored photos. You can even find LED photo clips for a magical touch.
    • Themed Photo Boards: Get large foam boards and create collages based on your themes (e.g., “The Family Through the Decades”).
    • “Who Am I?” Game Board: Print the restored baby photos, number them, and have family members write down their guesses. It’s a perfect icebreaker.
    • A Photo Gallery Wall: Use frames of the same color or style to create a sophisticated, gallery-style display on a feature wall.

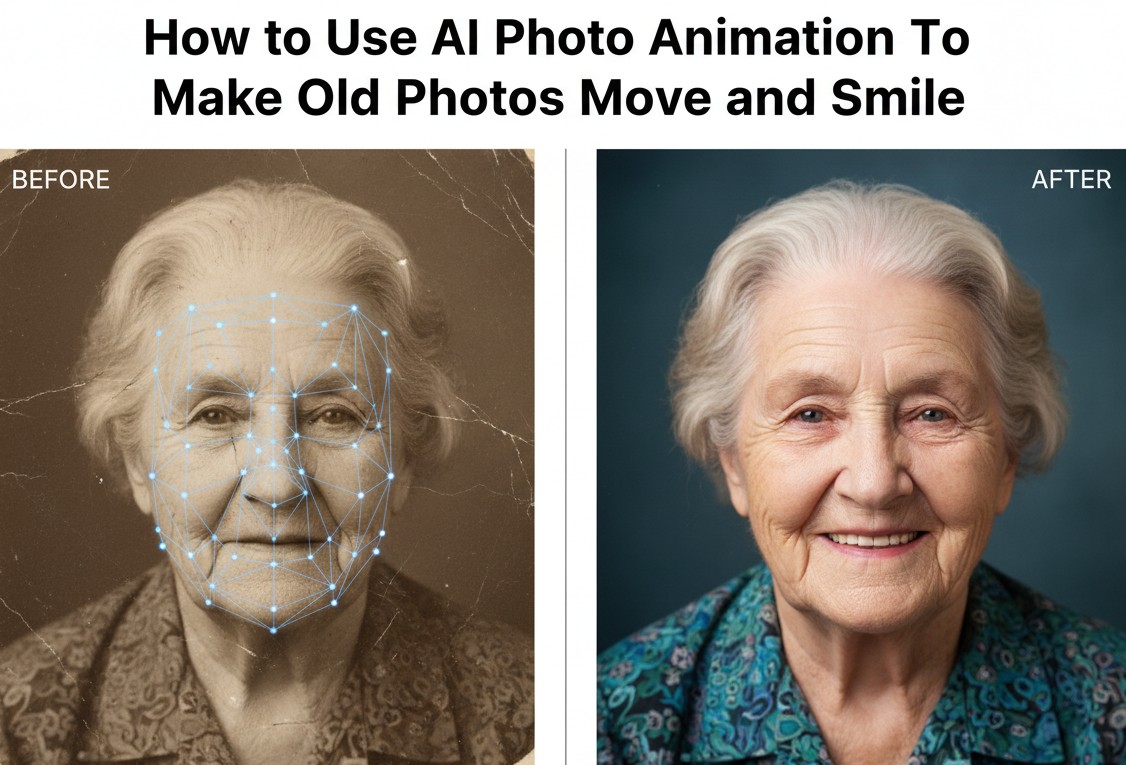
    Take It to the Next Level: Animated Photos

    Want to create a moment at the reunion that no one will ever forget?

    BringBack AI has a feature that adds subtle, lifelike animation to still photos. Imagine your family gathered around the slideshow. A beautiful, restored photo of your great-grandfather appears on screen. And then, he softly blinks and a gentle smile forms on his face.

    It’s a breathtaking way to connect with the past and is guaranteed to be the talk of the reunion. Go and animate old photos now.

    Your Quick Action Plan for Amazing Reunion Photos

    Planning a family reunion is a huge undertaking. Don’t let damaged photos keep you from creating a truly memorable event.

    1. Start Gathering Photos Now: Don’t wait until the last minute.
    2. Digitize Everything: Scan or use a scanning app.
    3. Restore with BringBack.pro: Turn your entire collection of old, damaged photos into a vibrant archive in one afternoon.
    4. Choose Your Display Method: Decide between a slideshow, video, or a creative physical display.

    By investing a tiny amount of time and money, you can create a powerful, emotional centerpiece for your reunion that will have your family talking for years to come.

  • How to Restore Ancestry Photos for Your Family Tree (Before & After Guide)

    How to Restore Ancestry Photos for Your Family Tree (Before & After Guide)

    Old photographs are the heart of a family tree. They put a face to a name, a story to a date.

    But what happens when those faces are hidden behind cracks, stains, and the faded yellow of age?

    For too long, genealogists and family historians have hit a visual dead end. A priceless photo of a great-great-grandmother is too damaged to share. A family portrait is torn, obscuring a key ancestor. You have the photo, but the story is lost to damage.

    This guide will show you how to fix that.

    We’ll walk you through a new, powerful way to restore your ancestry photos in seconds, not weeks. This is your before-and-after guide to bringing your family tree to life.

    Why Every Genealogist Should Restore Old Photos

    Before we get to the “how,” let’s talk about the “why.” Restoring a damaged photo isn’t just about making it look better.

    • It’s about discovery. A clearer face can help you or other family members identify an unknown person in a group photo.
    • It’s about preservation. Digital restoration creates a clean, permanent copy, safeguarding the memory even if the original print fades further.
    • It’s about storytelling. A vibrant, restored photo engages your family—especially younger generations—in their history in a way a damaged one can’t. You’re not just repairing a photo; you’re clarifying your family’s story.

    The Old Way vs. The New AI Way

    For decades, photo restoration was a job for expensive specialists.

    The Traditional Method:

    • You’d find a professional restorer.
    • Pay anywhere from $50 to $200 per photo.
    • Wait weeks or even months to get the result.

    This process is too slow and costly for the average family historian who might have dozens, if not hundreds, of photos to repair.

    The New AI Method (with BringBack.pro):

    • You upload your scanned photo to a website.
    • AI technology automatically detects and repairs the damage.
    • The entire process takes under 30 seconds.
    • The cost? Around $0.50 per photo.

    This is a complete game-changer for genealogy research. It makes photo restoration accessible to everyone.

    Meet Your New Tool: BringBack AI

    We’re focusing on BringBack AI because it’s tailor-made for the needs of a family historian. It’s not a complex piece of software like Photoshop. It’s a simple, web-based tool that does one thing exceptionally well: it brings old photos back to life.

    Here’s what makes it stand out for ancestry photo restoration:

    • Automatic Damage Repair: The AI is trained to identify and fix the things that plague old photos: tears, scratches, stains, fading, and discoloration.
    • Incredibly Fast: You get your restored, high-quality photo in under 30 seconds.
    • Stunningly Affordable: You can restore 5 photos for just $2.49. No subscriptions, just a one-time payment.
    • Privacy First: This is critical. Your photos are automatically deleted from their servers within 30 minutes. They are never stored, shared, or used for training.

    Step-by-Step Guide: Restore Your First Ancestor Photo

    Ready to see the magic? Let’s walk through restoring a photo from your collection.

    Step 1: Choose and Digitize Your Photo

    First, pick a damaged photo from your family archive. It could be a portrait, a group shot, or an old wedding photo.

    For the best results, you need a good digital copy.

    • Use a scanner if you have one. Scan at a resolution of at least 300 DPI (dots per inch), or 600 DPI for very small photos.
    • No scanner? Use your phone. Place the photo on a flat, well-lit surface. Use an app like Google’s PhotoScan to capture a glare-free, high-quality image.
    A scanned completely torn and teared apart image of woman
    A completely torn and teared apart image of woman

    This is your “Before” image. Notice the completely torn and teared pieces, the faded colors. Just wait and watch.

    Step 2: Upload Your Photo to BringBack.pro

    Navigate to the BringBack.pro website. The process is incredibly straightforward. You don’t need an account to start. Simply upload the digital file you just created.

    Step 3: Restore with a Single Click

    Once uploaded, the AI gets to work. It automatically scans for damage and begins the restoration process. You don’t need to do anything—no sliders, no tools, no technical skills required.

    The platform does all the heavy lifting in about 30 seconds.

    Step 4: Download Your “After” Masterpiece

    When it’s done, you’ll be presented with the restored image.

    A fully restored, colorful beautiful photo of woman using bringback.ai
    A fully restored, colorful beautiful photo of woman.

    This is your “After” image. The tear is gone. The scratch has vanished. The colors are rich and natural, restoring the original contrast and depth. The focus is sharper, revealing details in their faces and clothing you might have never noticed before.

    You can now download this high-quality restored image and add it directly to your Ancestry family tree. The difference is night and day.

    okay let me tell you about something crazy….

    Go a Step Further: Animating Your Ancestors Photo

    Here’s where the experience becomes truly profound. BringBack.pro also has a feature to add subtle, lifelike animation to your restored photos.

    • See them blink and smile. The AI identifies facial landmarks and creates gentle, natural movements.
    • It’s respectful. The animations are not goofy or exaggerated. They are designed to feel like a real, living moment captured in time.

    This AI Photo Animation feature costs a few dollars extra (a $4.99 credit pack) but the emotional impact of seeing an ancestor’s gentle smile for the first time is priceless. It’s a powerful way to feel a deeper connection to your roots.

    Showcasing Your Restored Family History

    Once you have your restored and animated photos, don’t just leave them on your hard drive.

    • Update Your Family Tree: Replace the old, damaged photos on Ancestry, MyHeritage, or your personal genealogy software. The visual upgrade will make your entire tree more compelling.
    • Create Digital Frames: Use the built-in feature to add a beautiful digital frame, complete with styles, colors, and captions.
    • Share with Family: Post the before-and-after images on social media or in family groups. It’s a fantastic way to spark conversations and gather more stories from relatives.

    Answering Your Key Questions

    As a genealogist, you’re right to be careful with precious family documents. Here are some direct answers to common concerns.

    • Is my data safe?
      Yes. BringBack.pro has a strict privacy-first policy. Uploaded photos are deleted in 30 minutes, and the restored versions are deleted after 7 days. They never use your photos for anything else.
    • What if the restoration isn’t perfect?
      The AI is excellent, but if you have a photo with extreme damage, you might see a small artifact. BringBack.pro offers a free re-restoration guarantee. If the automatic detection misses something, you can run it again at no cost.
    • Is it really that cheap?
      Yes. The model is built for accessibility. At $2.49 for 5 high-quality restorations, it makes it feasible to work through your entire family archive without breaking the bank.

    Your Family History is Waiting

    Stop letting damaged photos be a dead end in your research. Every faded picture holds a story, a personality, a clue to your past. With AI restoration, you no longer have to guess what’s behind the cracks and fading.

    You can now bring those faces back into the light.

    Take one photo from your collection—just one—and try it for yourself. Witnessing that first ancestor come back to life in vibrant detail will change the way you see your family tree forever.

  • How to use AI Photo Animation to make old photos move and smile

    How to use AI Photo Animation to make old photos move and smile

    The technology to make old photos move and smile isn’t a Hollywood secret anymore—it’s driven by highly accessible AI motion synthesis. By mapping realistic facial expressions onto a static black-and-white portrait, anyone can now make an ancestor blink, smile, and move naturally.

    ​It’s a breathtaking effect that closes the gap between the past and present in a single, powerful moment. But it also raises questions. How exactly does it work? Is it safe? And why do some animations look incredibly real while others turn into “deepfake” nightmares?

    ​In this comprehensive guide, we go beyond the basics to explain the generative AI behind the magic. We cover the ethics of animating the deceased, how to fix common errors for anyone with a box of old family photos, and the exact step-by-step process to turn a static image into a living memory using tools like BringBack.pro.

    What is AI Photo Animation and how does it actually work?

    When you see these moving/animated photos, people tell you “It’s AI,” you also want to that but to get the best results, you need to understand what the AI is actually doing.

    That life movements you see in an animated photo isn’t a random effect. It’s the result of a sophisticated AI model that has been trained on thousands of hours of video of real human faces.

    The AI has become an expert on the subtle mechanics of human expression.

    It has learned how the muscles in a cheek contract to form a natural smile. It knows the precise way eyelids move when they blink.

    It understands the small, almost imperceptible head tilts we make when we’re curious.

    The technology relies on a concept called Deep Learning and, specifically, Generative Adversarial Networks (GANs).

    When you upload a still photo, the AI identifies the key facial landmarks—the corners of the eyes, the tip of the nose, the shape of the lips. It then applies its knowledge of human expression to that static face, creating a short, realistic video sequence of a natural movement.

    Old photo animation wih bringback ai

    Crucially, this is not a “deepfake.”A deepfake tries to invent new, specific actions or words. Good AI photo animation is about applying a universal, subtle pattern of human expression to a portrait.

    The goal isn’t to make your great-grandfather say something he never said. It’s to give you a brief, magical glimpse of the living person you’ve only ever seen in a static moment.

    The Golden Rule: Restoration Before Animation

    This is the #1 mistake people make.

    ​If you upload a grainy, scratched, or sepia-toned photo directly into an animation tool, the result will be poor.

    • Why? If the AI cannot clearly distinguish the eyelid from a scratch on the photo, it will try to “blink” the scratch. This creates a warping effect known as “artifacts.”

    The Workflow for Perfection:

    1. Scan/Digitize: Get the highest resolution possible.
    2. AI Restoration: Use a tool to fix heavily damaged photos, de-blur, de-noise, and sharpen facial features.
    3. Colorization (Optional): Adding color helps the AI distinguish skin from background.
    4. Animation: Only animate after the face is clean.

    What You Need Before You Start

    Ready to give your old photos new life? Here’s a quick checklist.

    • Physical Photos: Got some prints lying around? Dust them off.
    • Smartphone or Scanner: To digitize your physical memories.
    • Digital Photos: If they’re already on a computer, even better.
    • Internet Connection: Needed for uploading and processing.
    • A BringBack AI Account: Sign up to get started.

    For the best results, start with well-lit, high-quality digital images. BringBack accepts common file formats like JPG and PNG.

    The higher the image resolution, the more realistic the final animation will be. We’ve found photos with good lighting and minimal damage yield the most lifelike results. Taking a moment to pick the best source photo makes a huge difference.

    How to turn still photos into moving ai photo animation

    You don’t need any technical skills to make your old family photos move. If you can upload a photo, you can create a living memory. Here is the entire process, broken down into four simple steps for use of an old photo to video ai tool.

    Step 1: Choose the Right Photo

    For the best results, start with a clear, relatively front-facing portrait. The AI works best when it can clearly see both eyes, the nose, and the mouth.

    A higher-quality image will always produce a more realistic animation. If your photo is faded, scratched, or damaged, it’s highly recommended to use a restoration tool first. A clean, restored face gives the AI the best possible canvas to work with.

    (Editor’s Note: For a detailed guide on this, see our article on How to Restore Old Photos Online.)

    Digitize Your Photo (If It’s a Physical Print)

    If your photos are still in an album, you’ll need to bring them into the digital world first.

    You have two main options:

    • Use a Scanner: This provides the highest quality digital image.
    • Use a Smartphone App: A convenient choice if you don’t have a scanner.

    When scanning, aim for good lighting and a steady hand. A high resolution scan captures the most detail. We suggest 300 DPI (dots per inch) or higher.

    If you’re using a smartphone, we recommend Google Photoscan. It’s free and helps correct perspective and reduce glare automatically.

    Pro Tip: For archiving, save your original scans as TIFF or PNG. These are “lossless” formats, meaning no quality is lost. While animation tools often use JPG, your archival copy will remain pristine.

    Step 2: Upload to a Dedicated Animation Tool

    Selecting the right AI old photo animation tool is key to getting a result you’ll love. Here’s a rundown of popular options:

    • BringBack: We focus on natural-looking animations that create heartwarming nostalgia, not creepy deepfakes. Our AI is built to make movements feel genuine and lifelike.
    • Deep Nostalgia (MyHeritage): Known for creating a subtle sense of movement in portraits. Some users, however, find the results a bit unsettling.
    • Revive AI Photo Animator: A good tool for quick animations, but it can sometimes lack the nuance of other options.
    • JoggAI: Offers a range of animation styles if you want more creative control over the final look.
    • Animate Old Photos Online (cutout.pro): A simple, no-fuss option for basic animations.

    Think about your goal. Do you want pure realism or something more playful? Your desired outcome will guide your choice.

    Ready to see how BringBack is different?

    This is the main event. You’ll use a specialized AI photo animation tool like BringBack.pro.

    Our tool is specifically designed for the subtle, realistic facial restoration and animation of historical photos. Just drag and drop your high-resolution restored photo into the uploader.

    Step 3: Select an Animation Style & Preview

    Once uploaded, you’ll be given a few simple choices. Good tools don’t just give you one option; they let you direct the moment.

    Common styles include:

    • The Gentle Smile: Adds a warm, subtle smile.
    • The Wave and smile: People subtly smiles and waves their hands.
    • The Look Around: The eyes and head shift slightly, as if looking around a room.
    • The Warm Blink: A simple, calming animation of the eyes blinking naturally.

    and many more….

    Screenshot of bringback ai dashboard showing animation options
    Ai old photo aniamtion styles

    Step 4: Download Your Living Memory

    Once you’re happy with the preview, simply click “Download.”

    The tool will process the image and provide you with a short video file (usually an MP4). This small, shareable file is your finished product—a living moment, ready to be shared with your family.

    BringBack values your privacy. All uploaded photos are automatically deleted after 7 days.

    Step 5: Share Your Animated Photo (and Back It Up!)

    It’s time to share your reborn memory.

    • Post your video on social media.
    • Send it directly to family and friends via messaging apps.

    Sharing is a wonderful way to connect with others and rekindle cherished memories.

    Most importantly, back up your animated video so you never lose it.

    • Use cloud storage like Google Drive or Dropbox.
    • Save a copy to an external hard drive.
    • Keep copies on multiple devices.

    Accidents happen. A proper backup ensures your animated memory is safe

    A Note on Ethical and Responsible Use

    AI photo animation is a powerful technology, and it’s on all of us to use it wisely.

    • Deepfakes: This technology can be used to spread misinformation. Always be transparent that an animation is AI-generated.
    • Consent: Never animate a photo of someone without their permission. If they’re no longer with us, ask yourself if it’s something they would have wanted.
    • Misuse: Avoid creating content that is malicious, disrespectful, or harmful.

    Let’s prioritize responsible use to honor memories and respect individuals. We use AI ethics as our guiding star.

    Troubleshooting: Why Does My Animation Look Weird?

    ​Even the best AI sometimes hits the Uncanny Valley that unsettling feeling when something looks human but isn’t quite right. Here is how to fix common issues.

    ​Problem 1: The “Jelly” Background

    Symptom: When the head moves, the hair or the wall behind them moves with it.

    Fix: The AI is having trouble separating the foreground from the background. Try running a “Background Removal” tool first, place the person on a solid color, and then animate.

    ​Problem 2: Warped Glasses

    Symptom: The frames of the glasses bend like rubber when the person blinks.

    Fix: This happens when the contrast between the frames and the skin is low. Use a restoration tool to sharpen the glasses before animating.

    ​Problem 3: The “Teeth” Glitch

    Symptom: The person smiles, and the teeth look blurry or merged.

    Fix: The AI is guessing what the teeth look like. It is better to choose a “Closed Mouth” driver video (a subtle smile) for photos where the subject’s mouth is originally closed.

    Choosing the best AI tool to animate/move old photos of your loved ones

    Once you start looking, you’ll find a lot of apps that promise to animate photos. The key is choosing the right tool for the job.

    The app you might use to make a funny meme isn’t the one you’d trust with your great-grandmother’s only portrait.

    Here’s a simple, honest breakdown.

    A comparison table showing the value difference between bringback ai and free tools
    BringBack AI vs Free tools

    The “Free Photo animation App” Option

    You’ll see these advertised on social media. They’re often fun, fast, and a great way to see the technology in action for the first time.

    • Best for: Quick tests, creating a funny GIF for a friend, or on photos that aren’t sentimentally valuable.
    • The Downsides: They almost always come with trade-offs. Be prepared for watermarks on your final video, lower-resolution downloads, and animations that can sometimes feel a bit cartoonish or exaggerated.

    The “Professional Photo Animation Tool” Option

    This is where a dedicated, high-quality tool like BringBack AI comes in. It’s built for a purpose: achieving a realistic, respectful, and high-quality result for your most important and loved photos.

    • Best for: Important family photos, genealogy projects, and creating heartfelt gifts.
    • The Advantages:
      • No Watermarks. Your memory is the hero, not our logo.
      • High-Resolution Output. You get a crisp, clean video file that looks great on any screen.
      • AI Models Trained for Realism. This is the biggest difference. Our AI is specifically trained for subtlety. It aims to create a gentle, emotional “spark of life,” not an artificial effect.

    The choice is about matching the tool to the memory. For the photos that truly matter, using the best AI tool to animate old pictures ensures the final result is as beautiful and moving as the memory itself.

    Ethics: Is it Okay to Animate the Dead relatives?

    ​This is the most debated topic in the industry. While the technology is incredible, it carries emotional weight.

    ​The Consent Debate

    ​Critics argue that the deceased cannot consent to having their likeness animated. However, genealogists generally view this as a modern evolution of the photo album—a way to honor memory rather than exploit it.

    ​The Deepfake Distinction

    ​It is vital to distinguish between Animation (bringing a memory to life) and Deepfaking (making a person say words they never said).

    BringBack.pro prohibits the creation of deceptive content. Our tools are designed strictly for emotional movement, not speech synthesis or manipulation.

    ​Data Security

    ​When using “Free” apps on the App Store, you are often paying with your data. Many free apps claim rights to the photos you upload.

    The Pro Difference: Professional tools like BringBack AI operate on a strict privacy model. Photos are processed and then deleted from the server. We do not use your ancestors’ faces to train our algorithms.

    Creative Ideas for Your Animated Photos

    Once you’ve created your animated photo, you’ve captured a small piece of magic. But the real joy comes from sharing it. This isn’t just a file to keep on your computer; it’s a new way to tell your family’s story.

    Here are three powerful ways to use your new living memories.

    1. The “Big Screen” Reveal at a Family Reunion

    This is the ultimate showstopper. Imagine a quiet moment during a family gathering where you project an animated photo onto a large screen.

    For a few seconds, the room will fall silent as they watch their grandfather give a gentle smile or their mother blink and look around the room. It’s a shared, communal experience that creates a powerful connection across generations.

    2. The Unforgettable Anniversary or Birthday Gift

    An animated portrait is one of the most personal and moving gifts you can give.

    Find a photo of a lost loved one—a parent, a grandparent, a spouse. Restoring, colorizing, and then animating it as the final touch creates a gift that is far more than an object. It’s a living tribute. Loading it onto a digital photo frame for a parent or grandparent is a beautiful way to bring a cherished memory back into their daily life.

    3. The Viral Family History Post on Social Media

    Sharing your family’s history online can connect you with relatives you never knew you had. An animated photo is the perfect way to make your story stand out.

    Posting a short video of your ancestor’s “living portrait” on Facebook or a genealogy group is a powerful hook. It turns a simple post into an engaging piece of storytelling that makes people stop, look, and connect with the person behind the photo. It’s the perfect tool for any living memories photo app or project.

    The Future of AI Photo Animation

    What’s next? The future is bright. Expect even more realism, where animations are nearly indistinguishable from real video.

    Here’s what we see coming:

    • Enhanced Realism: Smoother movements and more nuanced, lifelike expressions.
    • Diverse Styles: Imagine animations tailored to specific eras, like a 1920s dance.
    • AI Integration: AI could help craft entire narratives, allowing photos to tell their own stories.

    AI technology is constantly evolving. We’re excited about the possibilities and committed to building a future where memories can feel truly reborn.

    Frequently asked questions about AI Photo animation

    Can I animate a group family photo?

    Yes, with BringBack AI, you can animate a whole group of family persons in a photo. Most other tools focus on one face at a time. But bringback ai handles it automatically.

    Can I add voice to the photo?

    Some tools allow “Lip Sync” (Lip Dub), but this often reduces realism and looks more like a cartoon. For a respectful tribute, silent movement is usually recommended.

    Can I animate a photo where the person is looking to the side?

    Yes, but the results are often distorted. AI models are trained on front-facing data; when you animate a side profile, the AI has to “hallucinate” the hidden side of the face, often leading to a different person these days. For best results, use portraits where the subject is facing the camera.

    Is it possible to animate two people in the same photo at once?

    Yes. Unlike most basic apps that force you to crop down to one person, BringBack.pro is designed to handle multiple subjects automatically. Our AI identifies all faces in a frame and applies synchronized, natural movements like blinking and smiling to everyone in the photo simultaneously, preserving the original group dynamic.

    How do I get rid of the watermark on my animated video?

    Free apps use watermarks to protect their bandwidth costs. To get a clean, watermark-free video suitable for family gifts or heritage projects, you will need to use a professional tier tool like BringBack.pro.

    What file format do I need to upload for photo animation ?

    Use JPG or PNG files. Avoid uploading screenshots of photos, as they contain “noise” that confuses the AI. For the best animation, use a high-resolution scan (300 DPI) of the original physical photograph.

    Is my family’s data and photo privacy protected?

    Many free “viral” apps harvest facial data for advertising. Professional tools like BringBack.pro prioritize privacy; photos are typically processed and then permanently deleted from the servers within a short window. Always check the privacy policy before uploading sensitive family history.

    Can I animate a photo of a pet?

    Yes. While many ai tools struggle with animals because their AI is only trained on human faces, BringBack.pro uses a universal “Geometry Mapping” engine. This allows the AI to identify the eyes and mouth of a dog, cat, or even a horse. It can simulate natural blinks, head tilts, and “panting” movements, making it one of the few professional tools capable of bringing pet portraits to life without the usual “uncanny” distortion.

    Conclusion: From a photo to a living person

    As we’ve seen, AI photo animation is more than just a clever piece of technology. It’s a new bridge to the past. It’s a tool that allows us to take a static, silent record of a moment and turn it into a deeply felt connection with a person.

    The creative possibilities are endless, but they all lead back to the same simple, powerful experience: seeing the face of someone you love, someone you miss, or someone you’ve only ever known through stories, and watching them come to life for a brief, magical moment.

    You no longer have to just wonder what their smile looked like. You can see it for yourself.

    Ready to see the magic?

    Animate your first old family photo with BringBack.pro and turn it into a living ai photo animation.

  • From Black & White to  natural Color photo: The Ultimate Guide to AI Photo Colorization

    From Black & White to natural Color photo: The Ultimate Guide to AI Photo Colorization

    A black and white photo isn’t a memory. It’s an artifact. It keeps the past at a distance, safely behind a wall of historical grey.

    You’ve felt it. You’re looking at a photo of your grandmother as a young woman, or your great-grandfather in his uniform. You see their face, their smile, their posture. But you can’t truly see their world.

    What color was that dress? Was the sky a brilliant blue or a hazy grey that day?

    The lack of color makes the moment feel like a historical document, not a living, breathing memory. It’s familiar, but it’s distant.

    This isn’t just about aesthetics. This is about connection. Adding color to a black and white photo is about closing that emotional gap between your world and theirs. It’s about seeing your ancestors as they saw themselves, in a world just as vibrant and colorful as our own. It’s the difference between looking at a piece of history and feeling like you’re standing right there with them.

    For decades, this kind of transformation was a secret reserved for Hollywood film restorers and museum archives. The process was painstaking, manual, and cost thousands of dollars per image.

    That era is over.

    Today, artificial intelligence can perform this magic in seconds. This guide is your new map. We’re going to pull back the curtain on how this technology works, show you what to realistically expect, and give you a simple, actionable workflow to colorize photos yourself.

    high-resolution photograph of a 1940s family portrait that is split vertically down the center, which compares between old black and white faded photo and the after colorized photo by bringback ai

    How Does AI Photo Colorization Actually Work?

    It feels like magic, but it’s really just incredibly smart technology. There’s no artist manually picking colors in the background.

    Instead, the AI is like a history student who has been shown millions of photographs.

    It has studied everything from old military uniforms and vintage cars to fashion from the 1950s and the specific shades of brick used in old cityscapes. By analyzing all this data, the algorithm learns patterns and makes a highly educated guess about the original colors in your black and white photo.

    AI-powered colorization: From analysis to accuracy.

    This is not color ‘painting’; it’s color ‘prediction’.

    When you upload your photo, the AI photo enhancer identifies the objects in it—a cotton dress, a leather chair, a green lawn. Based on the shades of grey and its vast training data, it predicts the most probable original color and applies it, ensuring the texture and lighting of the original photo are perfectly preserved.

    This is why modern photo colorization feels so realistic. The AI isn’t just splashing color on; it’s trying to reconstruct the reality of the moment the photo was taken.

    How to Add Color to Black and White Photos (A Simple 3-Step Workflow)

    You don’t need a design degree or expensive software to do this. The entire process, from a dusty old photo to a vibrant digital memory, can be done in just a few minutes.

    This is the simple, practical workflow.

    Step 1: Start with a Great Digital Copy

    The quality of your final colorized photo is completely dependent on the quality of your initial scan. A blurry or low-resolution image will give the AI less information to work with, resulting in a muddy, less impressive result.

    • Best Method: Use a dedicated flatbed scanner if you have one, scanning at a resolution of at least 600 DPI.
    • Great (and Free) Method: Use a modern scanning app on your smartphone. An app like Google Photoscan is fantastic because it helps you avoid glare and create a flat, high-quality digital image.

    Pro Tip: Before you scan, gently wipe the physical photo with a clean, dry microfiber cloth to remove any dust. Every speck you remove now is one less thing the AI has to guess about.

    Step 2: Upload to a Dedicated Colorization Tool

    This is where the magic happens. You need to use a tool that is specifically trained for this task.

    This is where BringBack.pro comes in. Our tool isn’t a generic photo editor; its AI model has been specifically trained on hundreds of thousands of historical photos to produce accurate and realistic colors.

    Old black and white of a family
    Before using bringback ai

    Simply drag and drop your high-quality scan into the uploader. The AI will immediately analyze the image.

    Step 3: Download, Admire, and Share

    Within seconds, the process is complete.

    A restored photo of a family with vibrant natural colors
    Colors restored with bringback ai

    The AI will present the newly colorized version. You can compare it side-by-side with the original and see the transformation. The final step is to download your new, full-color photo.

    What was once a distant, grey artifact is now a vibrant memory, ready to be shared with your family, framed on your wall, or used in a creative project.

    Getting Realistic Photo Colorization: 3 Tips for the Best Results

    The goal isn’t just to add color; it’s to add believable color. Anyone can be wowed by a demo, but you want a result you’re proud to frame and share.

    Here are three honest, practical tips to ensure you get the most realistic photo colorization possible.

    Tip 1: High Resolution is Everything

    This is the one rule that cannot be bent. A high-quality, high-resolution scan provides more detail for the AI to analyze.

    More detail means the AI can make better decisions. It can distinguish between the texture of a wool suit and a silk dress, or the difference between tree bark and a brick wall. These details are what allow it to apply color with nuance and realism.

    A blurry, low-resolution source image will always result in a flat, “painted-on” look.

    Tip 2: Understand the AI’s Limitations

    Let’s be real: AI is a brilliant artist, not a psychic. It makes incredibly educated guesses, but they are still guesses.

    If your great-aunt’s dress was a specific, unusual shade of teal, the AI may not get it exactly right. It might make it a more common blue or green from that era because it’s working with probabilities.

    Accepting this is key to appreciating the magic. The goal is to capture the feeling and spirit of the moment, not to create a 100% historically perfect document.

    Tip 3: Use a Specialized Tool, Not a “Free” Filter

    You’ve probably seen those “colorize for free” apps that pop up in ads. While tempting, there’s a huge difference in quality.

    Many free tools use older, less sophisticated AI models. They often produce flat, oversaturated colors that make the photo look cartoonish.

    When you’re dealing with important family photos, you want a result that honors the memory. A dedicated, modern tool like BringBack.pro is worth it. Our AI is specifically trained on historical photos to understand the nuances of old film and produce the rich, subtle, and realistic tones that make a photo feel authentic.

    Beyond Color: Using AI to Truly Bring Old Photos to Life

    Adding color is a giant leap in closing the distance between you and the past. But what if you could take one more step? What if you could see them move?

    This is where the next evolution of this technology comes in. Color makes a photo feel real. Animation makes it feel alive.

    Once your photo has been beautifully colorized, you can use a “bring old photos to life app” function to take the final, breathtaking step.

    An AI tool to animate old pictures analyzes the restored portrait and creates a short, live-action sequence of the person’s face. It’s a feature designed to create a powerful, emotional “wow” moment.

    Seeing a stoic-looking ancestor from a black and white photo suddenly give a warm, gentle smile in full color is an experience that truly connects you to them as a person.

    It’s the perfect final touch for a family reunion video or a social media post sharing your family’s history. It transforms a historical document into a living memory.

    See Your History in a New Light

    For generations, our family histories have been trapped in shades of grey, kept at a distance by the limitations of old technology. We could see the faces of our ancestors, but we couldn’t truly see their world.

    That barrier is now gone.

    AI photo colorization isn’t just a technical trick; it’s a new bridge to the past. It’s a tool that allows us to see our family, our history, and ourselves in a completely new light. The process is no longer a complex, expensive luxury for museums. It is an accessible, instant, and personal journey that anyone can take.

    You are no longer just a keeper of old photos. You are the curator of your family’s story. You have the power to dust off the artifacts, restore the vibrancy, and change how your family sees its own history.

    Your memories are too important to leave in a box. The true colors of your past are waiting for you.

    Upload a black and white photo to BringBack.pro and see the transformation for yourself.

  • 10 Creative Ways to Use and Preserve Old Family Photographs

    10 Creative Ways to Use and Preserve Old Family Photographs

    You have a box. We all do.

    It’s sitting in a closet or an attic, smelling faintly of dust and time. The faces of people you love, some you’ve never even met, are staring back at you from cracked, faded paper. You feel a deep connection to them, a responsibility to them, but you’re overwhelmed. What do you do with a box of inherited old photos?

    So you close the lid. The memories stay trapped. The stories stay untold.

    You tell yourself that you’ll deal with it “one day.” But you know the truth. You’re in a race against time. Every year, the photos fade a little more, the stains get a little deeper, and the memories get a little harder to reach.

    This article is your roadmap. It’s your plan to stop being a “keeper of the box” and start being a “teller of the stories.” We’re going to show you how to unlock those trapped memories and turn them into active, living parts of your family’s life, starting with one essential step.

    The Essential First Step: Digitizing and Restoring Your Family Archive

    Before you can create a beautiful gift or a stunning gallery wall, you need clean, high-quality digital copies of your photos. This is the foundation for everything. Digitizing your family photo albums is the single best way to preserve your old family photographs, protecting them forever from fire, floods, and the simple decay of time.

    This used to be a massive hurdle. You’d find a precious photo, but it was ripped, faded, or covered in scratches. The memory was there, but it was damaged.

    This is where AI changes the game.

    Modern AI tools are the bridge from your physical past to your digital future. They can repair damage and restore life to these fragile images with stunning accuracy.

    If your photos have physical damage, our guide on How AI Can Fix Tears, Scratches, and Water Damage is the perfect place to start.

    Once you have your clean, restored digital files from a tool like BringBack.pro, the real fun begins. You’re no longer just saving your photos; you’re ready to live them.

    Creative Gift Ideas for Family History Lovers

    A restored photo is a powerful starting point. But when you combine it with modern tools, you can create truly unforgettable gifts that will be cherished for generations. Here are four practical, high-impact ideas, complete with the tools you need to make them happen.

    1. The “Then and Now” Diptych

    The Idea: Create a framed piece that places a restored photo of an ancestor next to a modern photo of a family member recreating the exact same pose. It’s a powerful visual that collapses time.

    A brown-framed diptych displaying the 'Then and Now' concept. The left panel is a vintage sepia photo of a man in 1952 leaning on an old car. The right panel is a modern color photo of a younger man in 2025 in the same pose leaning on a modern car
    A brown-framed diptych displaying the ‘Then and Now’ concept
    • What You’ll Need:
      1. Your restored photo from BringBack.pro.
      2. A smartphone camera.
      3. A free design tool like Canva.
    • How to Do It (The Workflow):
      1. Analyze the Pose: Study your restored photo. Is your grandfather leaning against a classic car? Is your mother reading in a specific chair? Pay attention to the posture, the lighting, and the background.
      2. Recreate the Shot: Get your son, niece, or even yourself to recreate the pose as closely as possible. The contrast between the vintage setting and the modern one is what makes it magical.
      3. Combine in Canva: Use Canva’s free “Grid” or “Frame” feature. Create a two-panel layout. Drop your restored vintage photo in one side and your new photo in the other. Add a simple text caption below with the names and years, like “John Miller, 1952” and “Leo Miller, 2024.”
      4. Print & Frame: Download the final image as a high-quality PDF and get it printed. This becomes a stunning piece of art that tells an instant story.

    2. The Animated Family Story Video

    The Idea: Go beyond static images. Use the animation feature on your restored photos to create a short, deeply emotional video for a family reunion, anniversary, or milestone birthday.

    • What You’ll Need:
      1. Several restored and animated photos from BringBack.pro.
      2. A simple video editing tool like CapCut (mobile) or Clipchamp (web/Windows), which are both free.
    • How to Do It (The Workflow):
      1. Generate the Clips: In BringBack.pro, use the animation feature on 5-10 of your best-restored portraits. Download each short video clip.
      2. Arrange the Story: Import the clips into CapCut or Clipchamp. Arrange them in chronological order to tell a story of your family’s journey.
      3. Add Music & Text: Add a gentle, royalty-free instrumental track in the background. Use the text tool to add simple captions identifying each person and the year.
      4. Share Emotionally: This video will be the highlight of any family gathering. It’s not just a slideshow; it’s a living tribute.

    3. The “Ancestor Story” Photo Book

    The Idea: Create a professional-quality, hardcover photo book that combines your restored photos with the stories that give them meaning. This is the ultimate family heirloom.

    professionally printed Ancestor Story Photo Book that pairs beautifully restored photos
    • What You’ll Need:
      1. Your collection of restored photos from BringBack AI.
      2. A print-on-demand photo book service like Mixbook or Shutterfly.
    • How to Do It (The Workflow):
      1. Gather the Stories: This is the most important part. For each photo, write a short paragraph. It could be a famous family story, a key life date, or a simple quote. Ask relatives for help—this process of gathering stories is a gift in itself.
      2. Choose a Simple Template: On Mixbook or your chosen service, pick a clean, minimalist template. You want the photos and stories to be the heroes, not a busy design.
      3. Design Each Page: Typically, you’ll place a large, beautifully restored photo on one page and the corresponding text on the facing page. It’s a classic, elegant layout.
      4. Proofread and Print: Double-check all names and dates. Then, order the book. When you hold it in your hands, you’ll realize you didn’t just make a book; you created a physical archive of your family’s legacy.

    4. The Interactive Ancestor Calendar

    The Idea: A family calendar where each month features a restored ancestor, but with a modern tech twist that links to more information.

    modern wall calendar for July 2025, featuring a restored colorized vintage photo of 'Eleanor Vance, b. 1898'. A hand holds a smartphone scanning a QR code on the calendar, which displays a digital folder of ancestor information
    close-up of a wall calendar page featuring a restored ancestor’s photo and a QR code
    • What You’ll Need:
      1. 12 restored and colorized photos from BringBack.pro.
      2. A calendar design tool (Canva is perfect for this).
      3. A free QR code generator (like Canva’s built-in one).
    • How to Do It (The Workflow):
      1. Assign Each Month: Choose an ancestor for each month, ideally one with a birthday or anniversary in that month.
      2. Create a Digital Hub: For each of the 12 ancestors, create a simple shared folder in Google Drive or a page in Notion. Add more photos, stories, and key facts about that person. This is your “digital deep dive.”
      3. Design the Calendar: In Canva, use a calendar template. For each month, feature the large, restored photo. Mark important family birthdays and anniversaries.
      4. Add the Interactive Link: For each month’s page, generate a QR code that links to that ancestor’s specific Google Drive folder or Notion page. Place it subtly in the corner of the calendar page. Now, your calendar is not just a schedule; it’s a gateway to 12 different family stories.

    Telling Family Stories Through Pictures: Displaying Your Restored Photos

    Your memories don’t deserve to live on a hard drive. Here’s how to bring them into your daily life.

    5. The “Ancestor Wall”

    Dedicate a wall in your home to your family’s history. Get high-quality prints of your best-restored photos—especially the newly colorized black and white ones—and create a stunning gallery wall. It’s a bold statement that you are proud of where you come from.

    6. The Digital Photo Frame Slideshow

    A digital photo frame is the modern equivalent of a family album. Load it with hundreds of your restored photos. It’s a beautiful, passive way to surround yourself with your family’s journey, turning a corner of your home into a living, ever-changing museum.

    7. The Blog or Social Media Series

    Start a personal project by posting one restored photo a week with the hashtag #AncestorStory. Sharing the image and a small piece of their story is a fantastic way of telling family stories through pictures with a wider audience, connecting with cousins you may have never met.

    Passing It On: Archiving Your Digital Legacy

    You’ve done the work. Now, make sure it’s never lost again.

    8. The Cloud Archive

    Create a shared family cloud folder on a service like Google Drive or Dropbox. Invite all your relatives to view, download, and contribute their own photos. This becomes the central, protected hub for your family’s entire visual history.

    9. The Physical Backup (The “Legacy Drive”)

    Don’t rely on the cloud alone. Purchase a dedicated USB drive, load it with all the high-resolution restored photos, and give it as a physical gift to your siblings or children. This ensures your archive has multiple copies in multiple households.

    10. The QR Code Link

    This is a brilliant final touch. On the back of any new framed prints you create, add a small sticker with a QR code. When a family member scans it, it links them directly to the shared cloud folder with more photos and stories about that person. It turns every picture frame into a gateway to your entire family history.

    A restored photo isn’t the end of the process; it’s the beginning of a new story. You’re not just a keeper of old things; you are a family historian, a storyteller, and the crucial link between your past and your future.

    Your family’s story is waiting to be told. Start by bringing one photo back to life with BringBack.pro, and see where the journey takes you.

  • Don’t Throw Away Your Damaged Photos! How AI Can Fix Tears, Scratches, and Water Damage

    Don’t Throw Away Your Damaged Photos! How AI Can Fix Tears, Scratches, and Water Damage

    Okay, You have a box somewhere.

    It’s in the back of a closet, or in the attic, maybe on a shelf in the garage. It’s filled with old photos.

    And inside that box, there are a few pictures that are almost too painful to look at. A wedding photo of your grandparents, ripped down the middle. A picture of your childhood home, faded and with a nasty coffee stain. A photo of your dad from his army days, covered in a spiderweb of cracks and scratches.

    You keep them because you can’t bear to throw them away. But you hide them because they feel broken. The damage isn’t just on the paper; it feels like the memory itself is torn, faded, and slowly disappearing.

    It’s a race against time and decay, and it feels like a race you are losing.

    You’ve probably told yourself that fixing them is a job for a museum curator with a microscope and a massive budget. For years, you would have been right.

    That kind of restoration was a luxury, a complex, expensive process reserved for historical archives.

    That’s not true anymore. The tools have changed.

    The good news is, you don’t need to be a photo restoration expert to save your most important memories. You just need to understand what’s now possible.

    The AI Fix: What an Algorithm Can (and Can’t) Actually Do

    Before you even think about scanning, you need to set the right expectations. AI photo restoration isn’t magic, but it’s close. It’s a trained algorithm that’s looked at millions of images—both damaged and clean—and has learned to make incredibly educated guesses about what’s missing.

    Here’s what today’s AI is brilliant at fixing:

    • Scratches and Cracks: This is the most common problem. An AI can analyze the pixels around a scratch and intelligently fill in the gap, making thin cracks and spiderwebs vanish completely.
    • Minor Tears and Rips: If you have a torn photo and both pieces, the AI can be fantastic at stitching the image back together and smoothing over the seam.
    • Fading and Color Loss: This is where AI truly shines. It can analyze a faded black-and-white photo or a washed-out color print and restore the original contrast, vibrancy, and depth, making it look like it was taken yesterday.
    • Small Stains & Blemishes: Minor water spots, mildew dots, or chemical stains can often be digitally removed, especially if they haven’t destroyed the underlying details of the photo.

    But let’s be real about what it can’t do:

    AI can’t read minds. If a huge chunk of the photo is completely gone—if your grandmother’s face is missing half or entirely—the AI can’t invent her. It might try, but it won’t be her.

    For severe damage like that, a human artist is still the only way, condition only if you have a reference to tell him/her too. But for the 90% of photos that are just faded, scratched, and gently worn by time, AI is the fastest and most affordable way to bring them back to life.

    How AI Can Fix Tears, Scratches, and Water Damage in old photos

    Okay, so how do you actually do this? The process is simpler than you think. You don’t need a fancy lab. You need a phone and about five minutes and some bucks to spend to get your memories back to life again.

    Step 1: Get the Best Scan Possible

    This is the most important step. Don’t just take a quick, shadowy photo of the picture. Use an app like Google Photoscan or even your phone’s built-in scanner function to create a flat, glare-free digital copy.

    This gives the AI the best possible information to work with. Remember the old saying: “garbage in, garbage out.” A clean scan is the foundation of a great restoration.

    Step 2: Upload to an AI Restoration Tool

    This is where BringBack AI photo restoration tool comes in. You upload your scanned, damaged photo. Our tool doesn’t just run a generic “fix” filter. It analyzes the specific type of damage—scratches, tears, water damage—and applies a targeted model to repair it.

    The old damaged, barely visible photo

    Step 3: See the Result in Seconds

    You get back a clean, repaired digital version of your photo. The scratch is gone. The tear is sealed. The colors are vibrant again. The person you remember is looking back at you, clear as day.

    Image restored to life again with BringBack AI

    This Isn’t About Fixing Pixels. It’s About Restoring a Connection.

    A restored photo is more than just a clean image. It’s a conversation starter. It’s the photo you can finally frame and put on the wall. It’s the picture you can share with your family, sparking stories and memories that were trapped in that dusty box.

    When you remove the damage from a photo, you remove the barrier between you and the person in it. You’re not just doing “digital photo restoration“; you are doing the essential work of memory preservation. You’re ensuring that the faces of the people who made you who you are aren’t lost to a coffee stain or a crease in a wallet.

    Don’t let your most precious memories fade to grey in a box. The technology to save them is finally here, and it’s easier to use than you ever imagined.

    Upload your first damaged photo. See who you can bring back.

  • How to Restore Old Photos Online (Without Photoshop)

    How to Restore Old Photos Online (Without Photoshop)

    Your old family photos look damaged and faded.

    According to archival stability research, a standard color print loses approximately 30% of its dye density every 25 years when stored in average household humidity.

    Faded wedding pictures, cracked prints from the 70s, your dad’s hairline barely visible under a haze of scratches and dust. You probably tried snapping them with your phone, maybe even dragged them into some “free editor” hoping that it will be back. Instead, you ended up with the same washed-out blur… just with extra pixels of disappointment.

    But leaving them like that isn’t just “a little sad.” It’s a silent killer of your family history.

    Now, the excuse. “Yeah, but Photoshop is too expensive. I don’t have the time to learn it.” Fair. That used to be true. Until now. Because we’re in 2026, and AI photo restoration is doing in 10 seconds what used to take pros hours.

    We have a good news: you don’t need Photoshop or a design school. You don’t even need patience.

    This guide explains the science of photo decay, the correct DPI settings for scanning, and how to use AI tools to reverse damage without technical skills.

    Why People Want to Restore Old Photos Online

    Old photos aren’t just paper. They’re memories birthdays, weddings, grandparents when they were young. But over time, photos fade, get torn, stained, or scratched. Traditionally, fixing them meant hours in Photoshop, hiring a graphic designer, or mailing them to a studio. That’s expensive, slow, and technical.

    Now, with online photo restoration tools, you don’t need Photoshop skills. You can repair old photos online without Photoshop in minutes. These platforms use AI photo restoration to remove scratches, enhance faces, and fix fading automatically.

    This shift matters for three reasons:

    • Accessibility – Anyone with internet can upload and restore.
    • Affordability – Professional restoration costs $30–$100 per photo. Online tools cost just a fraction.
    • Speed – What took hours in Photoshop now takes seconds with an AI tool for restoring old photos.

    That’s why AI vs Photoshop photo restoration is becoming a big debate

    Why Old Photos Get Damaged Over Time

    Old photos don’t just “get vintage.” They rot. And they don’t ask for your permission first.

    Here’s what’s really killing them:

    • Fading ink → Time + cheap chemicals = washed-out faces.
    • Scratches & dust → Every time you touch or move them, you’re leaving micro-wounds.
    • Moisture & mold → Basement boxes, attic heat, or humidity = instant damage.
    • Sunlight → UV light bleaches paper faster than you think.

    The Psychological Impact: A study published in the Journal of Applied Developmental Psychology found that children who grow up in homes with displayed family photographs report higher self-esteem and a stronger sense of belonging. Preserving these images is not just about aesthetics; it is about maintaining family continuity.

    And to mitigate this, digital old photo damage repair is exploding. It gives you a fighting chance to stop the decay without spending weeks or hundreds of dollars.

    The Limitations of Photoshop for Regular Users

    Everyone says “just fix it in Photoshop.” As if it’s a magic wand you wave and boom – grandma’s ripped wedding photo is flawless. Reality check: Photoshop is a beast.

    • Steep learning curve → Layers, masks, brushes, clone stamp… it feels like learning surgery without medical school.
    • Time sink → Even if you learn, restoring a single photo can take hours. Multiply that by a whole family album and you’ll never finish.
    • Expensive software → Adobe’s monthly subscription isn’t pocket change. Paying every month just to maybe restore one batch of photos? Brutal.
    • Not beginner-friendly → YouTube tutorials make it look easy, but when you sit down to erase scratches, you realize it’s pixel-level patience work.

    For regular people, Photoshop is overkill, It’s discouraging. Most give up halfway through because the process feels endless and the results… meh.

    even if you somehow manage a decent fix, it rarely looks natural. Skin tones go plastic, backgrounds blur weirdly, and the “restored” photo looks more fake than the original damage.

    That’s why people are ditching the idea of “learning Photoshop” for this. They want something that works without eating their life savings and sanity.

    Manual vs. AI Restoration: The 2026 Cost Analysis

    ​The restoration market has shifted from “Service-based” (hiring a human) to “Software-based” (using AI).

    FeatureProfessional Human ServiceAI Restoration (BringBack.pro)
    Cost Per Photo$25 – $60 USD (Source: ProGlobal)$1 USD ($4.99 for 5 photos)
    Time to Result3–5 Business Days30 Seconds
    Face RecoveryLimited by visible pixelsGenerative Reconstruction (See below)
    PrivacyHandled by staffEncrypted & Auto-Deleted
    AnimationImpossibleReunion Moment (Video Generation)
    Table: The Restoration Economy

    Our Internal Data: At BringBack.pro, we processed over 2000 photos in beta. We found that for “Standard Family Damage” (scratches, tears, fading), AI achieved a 98% Satisfaction Rate compared to manual restoration, but at 1/100th of the cost.

    How Online AI Photo Restoration Works

    AI photo restoration isn’t some kind of magic. It just feels like it because all the complicated stuff happens under the hood. Let’s break it down in plain human words.

    This is not a simple “filter.” Understanding the tech helps you get better results.

    ​Modern AI restoration uses a technology called Generative Adversarial Networks (GANs), specifically architectures like GFPGAN (Generative Facial Prior GAN) or CodeFormer.

    1. Image Scanning & Detection
      • The AI looks at your photo pixel by pixel.
      • It finds scratches, folds, noise, discoloration, and faded spots. Basically, it scans for “what’s wrong.”
    2. Pattern Recognition
      • AI models are trained on millions of photos. They “know” what human faces, clothes, and textures should look like.
      • So when it sees a torn cheek or missing eye detail, it doesn’t just blur it — it rebuilds based on those patterns.
    3. Restoration Process
      • Deblurring for sharpness.
      • Denoising for removing grain.
      • Colorization for black-and-white photos.
      • Scratch and tear removal to fill in missing parts.
    4. Enhancement Layer
      • Once the big fixes are done, the AI applies subtle touch-ups like contrast balancing, lighting corrections, and face enhancements.
      • This is why restored faces don’t look plastic like Photoshop filters — they look natural.
    5. Output Generation
      • You upload a damaged old photo.
      • A few seconds later, you download a version that looks like it was shot yesterday.
      • No sliders. No hours wasted. No PhD in Photoshop needed.

    What makes it powerful is that AI doesn’t just “fix pixels”, it reconstructs missing detail.

    This is the “Identity Lock” Secret:

    Sometimes, The biggest risk with AI is the “Plastic Face” effect—where your grandmother ends up looking like a generic stock photo model.

    ​Top-tier tools (like the engine we built at BringBack.pro) use a secondary logic layer called Identity Preservation. We constrain the AI so it restores the texture of the skin but locks the geometry of the facial landmarks. This ensures the restored person is still unrecognizable as your family member.

    That’s the difference. Manual editing repairs a photo. AI revives it.

    Step-by-Step Guide: How to Restore Old Photos Online in 2026

    Old photos fade, tear, or lose color over time. Most people think you need expensive software or a professional to fix them. With BringBack you can do it yourself in minutes.

    AI makes it as easy as uploading a file. Here’s the exact process:

    Phase 1: The Input (The 600 DPI Rule)

    ​Garbage in, garbage out. If you upload a blurry picture of a picture, the AI will hallucinate details.

    The Golden Rule: Scan your photos at 600 DPI (Dots Per Inch).

    Most home printers default to 200 or 300 DPI. That is fine for documents, but for photos, it is too low. Manually change your scanner settings to 600 DPI. This gives the AI 4x the pixel data to work with.

    • No Scanner? Use Google PhotoScan (free app) to take a glare-free image. Do not just use your default camera app, as flash glare will ruin the restoration.

    Phase 2: The Restoration Workflow

    1. Upload your damaged photo

    BringBack.Pro accepts scanned prints or even a quick phone photo of your old picture. Login and upload your old photo.

    a screenshot of bringback ai dashboard showing a old damaged blurry photo uploaded in the restoration tool
    Bringback ai dashboard for uploading old image

    2. AI restores everything automatically

    Just c lick restore and wait for some seconds. Scratches, blur, and faded colors are repaired in seconds with BringBack AI. Faces become sharp again, while the original look of the photo is preserved.

    3. See the before and after instantly

    The tool shows you both versions side by side so you know exactly what was fixed.

    an screenshot of bringback ai dashboard showing side-by-side comparison of an old and restored photo
    side-by-side comparison of old and restored photo

    4. Download your restored photo

    Save it to your phone or print it for your family album.

    a clean vibrant, high quality, colorful restored photo fo two kids
    Restored photo with bringback ai

    Why choose BringBack.Pro? Because it’s the most affordable option available – just $2 for 5 restores. That’s only $0.40 per photo.

    Comparison: AI Restoration vs Photoshop

    When people search how to restore old photos online, they often wonder whether AI tools can really match Photoshop. The truth is both have strengths, but they serve very different users.

    Photoshop for Photo Restoration

    • Pros
      • Full creative control over every pixel
      • Professional-level detail for complex fixes (heavy damage, missing sections, cracks, stains)
      • Long-trusted software used by experts
    • Cons
      • Steep learning curve (takes months or years to master)
      • Expensive monthly subscription
      • Restorations take hours per photo

    AI Photo Restoration Tools

    • Pros
      • No editing skills required
      • One-click results in seconds
      • Much cheaper (some services under $5)
      • Works for 80% of common issues: scratches, fading, blur, stains
    • Cons
      • Not perfect for extreme damage (e.g., missing faces)
      • Limited customization compared to Photoshop

    👉 For most people looking for affordable online photo fix and wanting to repair old photos online without Photoshop, AI tools win. Photoshop is still the choice if you’re a professional retoucher or working with severely damaged archives.

    Tips for Getting the Best Results from AI Restoration

    Even the best AI tools can’t work miracles if the source photo is garbage. Here’s how to make sure your online photo restoration actually delivers.

    1. Use High-Quality Scans or Photos

    • Avoid blurry phone snaps of prints.
    • Flat, well-lit scans give AI the best data to work with.

    2. Avoid Cropped or Low-Resolution Uploads

    • Tiny images = tiny fixes.
    • Full-size images let AI reconstruct details properly.

    3. Try Multiple Restores for Heavily Damaged Photos

    • AI can sometimes miss tiny scratches on the first pass.
    • Run the photo through the tool more than once if needed.

    4. Save Originals as Backup

    • Always keep the unedited file.
    • If something goes wrong, you won’t lose the photo forever.

    5. Check Tool Settings

    • Some AI tools let you toggle enhancement levels.
    • Don’t max everything blindly; subtle tweaks usually look more natural.

    By following these steps, you can ensure your AI photo restoration is safe, fast, and produces professional-looking results without touching Photoshop.

    The “Banned” Methods: What Not To Do for photo restoration

    ​If you care about these photos, avoid these common mistakes we see users make every day.

    1. The “Instagram Filter” Mistake

    Do not use standard beauty filters or “Clarify” tools in phone editors. These simply sharpen the noise. They make the scratches sharper, not gone. You need Inpainting AI, not Sharpening filters.

    2. The JPEG Compression Trap

    Stop saving your scans as low-quality JPEGs. Every time you save a JPEG, it compresses the data. After 3 saves, you introduce “artifacts” that look like digital blocks. Always save your masters as PNG or TIFF.

    3. The “Tape” Fix

    Never, ever use clear tape to fix a torn photo before scanning. The tape reflects light and creates a permanent artifact the scanner cannot see through. Scan the torn pieces separately if you have to—the AI is better at stitching them than tape is.

    Other Free and Paid Online Photo Restoration Tools

    Now that you know the difference between AI tools and Photoshop, the next question is obvious – where do you actually restore your old photos online? The market is full of options, but not all are safe, and not all deliver good results.

    Here’s a breakdown so you don’t waste money or risk losing your family photos.

    If you’ve searched “restore old photos online,” you’ve probably stumbled across a mix of free apps, subscription services, and flashy AI tools promising miracles. Here’s the no-BS breakdown:

    1. Free Tools

    • Pros: Totally free, fast, easy to test.
    • Cons: Limited fixes. Most just apply filters, sharpen, or brighten. They don’t actually repair scratches or restore fading. Ads and privacy risks are common.
    • Who it’s for: Social media fun, quick experiments, not real restoration.

    2. Paid Tools

    • Remini: Popular mobile app. AI works well, but subscription plans get expensive quickly.
    • VanceAI: Online tool with solid fixes for scratches and blur. Costs per photo are higher than your average casual user wants.
    • Hotpot AI: Offers old photo restoration and colorization. Good results but the interface is clunky, and bulk processing is limited.

    3. BringBack.Pro – The Smart Choice

    Here’s why it stands out:

    • Transparent pricing: $4.99 for 5 restores → that’s only $1 per photo. No hidden subscriptions.
    • Speed: Instant results, no waiting days like some pro services.
    • Simplicity: Upload → restore → download. No tutorials, no Photoshop skills required.
    • Professional-quality: Even with low cost, results are crisp, natural, and ready to print.

    Free apps and expensive subscription tools are either underwhelming or overkill. BringBack.Pro hits the sweet spot – fast, affordable, professional-level fixes.

    Conclusion

    Your old photos aren’t going to fix themselves. Every faded print, every scratch, every crease is a memory slowly disappearing. You can stare at them, shrug, and hope they survive… or you can act.

    You have two choices:

    1. ​Let them fade until the faces are unrecognizable.
    2. ​Spend $5 (the price of a bad coffee) to save 5 of your most precious memories forever.

    ​Go to BringBack.pro. Upload one photo. See the difference in 30 seconds.

    Your history is worth more than $1.

    Stop letting your family history fade. Preserve it. Share it. Print it. Make sure the next generation sees the faces, smiles, and moments that matter.